The Officers panel lists all on-duty officers and allows you to set their states and locations, reset alerts, and take officers on or off duty.
To open Officers in a floating panel, click  Officers in the ribbon.
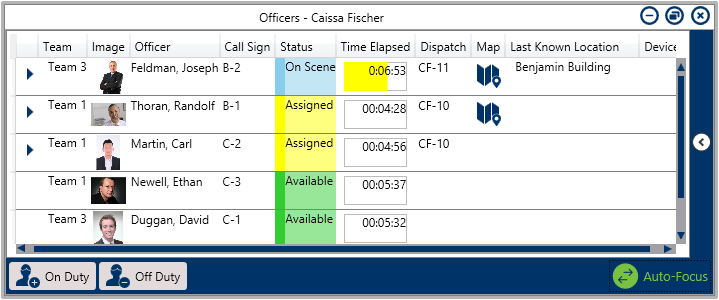 The Officers panel.
Clicking on any of these columns (except Image, Map, or Device) arranges the officers alphabetically based on the columns’ information. You can also show/hide the officer details columns by right clicking on one, then selecting/de-selecting the column’s checkboxes. The Officers Panel columns include:
- Team: The officer’s assigned team when they’re brought on duty.
- Image: The officer’s profile photo. If your administrator has not uploaded an image for said officer, the
 icon will appear in this column.
 - Officer: The officer’s full name.
- Call Sign: The code assigned to the officer as they’re brought on duty (which can also be updated in the right-click menu).
- Status: The officer’s current state (e.g., Available, Assigned, Break). There is also a custom “Busy” state for giving more context (e.g., they’re taking lunch, writing a report, or on-duty elsewhere).
- Time Elapsed: The amount of time an officer has been in their current state.
- Hovering your cursor over this column’s icon shows the Officer Alerts Details window, which displays:
- Status – the alert criteria
- Planned – the time allowed
- End Time – when the alert is due to expire/the time it expired
- +/- column – time left/time passed since the alert expired.
- If no officer alert has been created for the officer’s Status, this column will display a timer only.
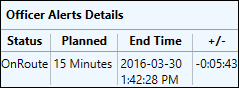 The Officer Alert Details.
- Hovering your cursor over this column’s icon shows the Officer Alerts Details window, which displays:
- Dispatch: The number of an assigned dispatch. If the officer hasn’t been assigned a dispatch, this column appears blank.
Map: If the
 icon appears in this column, the officer’s last known location is a saved location in the Dispatch app. Clicking this icon opens a map focused on the officer’s location. Indoor locations can also be searched when setting the Officer’s current location, or in the Create Dispatch panel.
 icon will appear in this column.
 icon appears in this column, the officer’s last known location is a saved location in the Dispatch app. Clicking this icon opens a map focused on the officer’s location. Indoor locations can also be searched when setting the Officer’s current location, or in the Create Dispatch panel.
 The Create Dispatch screen.
Last Known Location: Displays the officer’s last known location. A dispatcher can select it by clicking Set Location in the panel.
Device: Panic Alerts can be triggered from Officer Mobile OR directly in the Dispatch application. If the officer is using the Officer Mobile app, the
 icon appears in this column.
Other tasks can be done by clicking the icons throughout the panel. If selecting multiple officers to perform bulk actions (e.g., setting multiple officers as on-duty), hold down the Ctrl or Shift key, select the Officers, then click the appropriate icon.
| Icon | Function | |
|---|---|---|
|
| |
| Allows you to select a saved location for an officer, either by entering a search term, or clicking the | |
| Resets the timer or officer alert to 00:00:00 in the Time Elapsed column. | |
| Opens the Bring On Duty window to select on-duty officers, then choose their teams and call signs. You can also take officers off duty from this window. Officers can bring themselves on duty using Officer Mobile, but you may still remove them at any time. | |
| Takes an officer off duty. If that officer is assigned to a task, its status reverts to Unassigned. Officers can also take themselves off duty using Officer Mobile, but you may still bring them back on duty at any time. | |
| Appears on the far right of the panel. Clicking this icon reveals the panel’s filter options, including Team and Officer State. Click the arrow icon again to close the filter options. | |
| Appears next to an officer’s name to indicate the officer has been assigned to one or more tasks. Clicking this icon will reveal those tasks and allow you to change the task status. Newly assigned ones appear on the end of the officer’s current list (instead of the top of their tasks list). | |
| Changes an officer’s status on a task from Assigned to On Route. This icon appears after clicking the | |
| Changes an officer’s task status from On Route to On Scene. This icon appears after clicking the | |
| Changes a task status to Cleared on an Assigned, On Route, or On Scene task. This icon appears after clicking the | |
| Suspends a in-progress task and creates a duplicate one for the same officer. This function is used when an officer must divert their attention from an already started task. This icon appears after clicking the | |
| Allows you to select a new officer for a previously assigned task. This icon appears after clicking the | |
| Rearranges an officer task by moving a selected task up in the list. This icon appears after clicking the | |
| Rearranges an officer task by moving a selected task down in the list. This icon appears only after clicking the | |
| With auto-focus enabled, it automatically selects the associated officer in the panel. This is done by clicking an officer task in the Dispatches panel, an officer on the Map, or a task on the Map. This icon appears greyed out when auto-focus is disabled. | |
| Allows you to choose if the panel is floating, dockable, or hidden. Selecting Auto Hide conceals the panel until your cursor hovers over a newly created tab at the window’s left. This icon appears at the panel’s top right. | |
|
|