To create an operational zone, work zone, and/or teams:
Click Settings >
 Work Zones & Teams.
Click the
 Create icon in the pane to the left.
Enter the name of operational zone (e.g. “South Campus”) in the Operational Zone Name field. By default, this field is pre-populated with New Op Zone.
Optional: Enter a prefix in the Dispatch Prefix field (e.g. “SouCam”).
Click the
 icon next to Work Zones.
 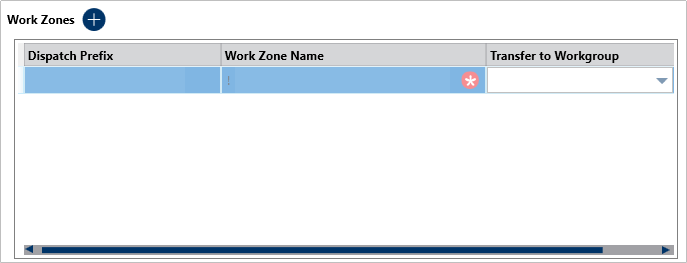 A new work zone.
Optional: Click the Dispatch Prefix field to enter a dispatch prefix for the work zone. This prefix will appear on any dispatches occurring in this work zone. If this field is left blank, all dispatches in the work zone will use the operational zone prefix entered in the Dispatch Prefix field. If no operational zone prefix was entered, each dispatch will be assigned a numerical value only.
Click the Work Zone Name field and enter a name (e.g. “Cafeteria”).
Select a business unit from the Transfer to Workgroup dropdown. This selection will determine which user has permission to view the dispatch once it's closed and moved to Command Center as an activity.
Repeat steps 5-8 to create additional work zones as needed.
Click the
 icon next to Teams.
 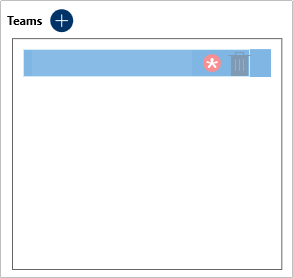 A new team.
Click the field under Teams and enter a name (e.g. “CAF Team”).
Select the zone(s) the new team will have access to by clicking the team to select it under Teams then selecting the checkboxes next to the zones under Assigned Work Zones. For example, the Cafeteria team will need to have access to the cafeteria, but because officers from this team occasionally work in the library, you would select the Cafeteria and Library checkboxes.
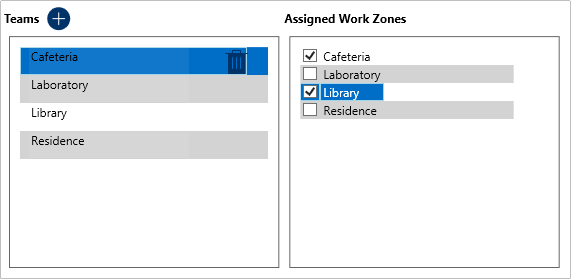 The Assigned Work Zones for a selected team. In this case, the Cafeteria team has been assigned the Cafeteria and Library work zones.
Optional: If you want to create a visual alert for a team:
Select Default, Classic, High Contrast, or Resolver Theme from the Theme dropdown menu.

Ensure the visual alert theme matches the theme selected in the User Settings, otherwise you won’t be able to see your changes. Select a color from the Color dropdown menu. If you don’t want to display a color, select
 Transparent from the color picker.
Select the Bold, Italic, Underline, and/or Strikethrough checkboxes to add more font styles.
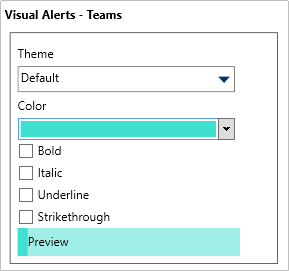 A visual alert for a team.
Repeat steps 10-13 to assign more teams as needed.
 Work Zones & Teams.
 Create icon in the pane to the left.
 icon next to Work Zones.
 icon next to Teams.


 Transparent from the color picker.