When creating a new task, you can assign an officer at the time of creation, which is discussed in the sections below, or you can assign an officer after the task is created. See Assign an Officer to a Task for more information.
 | Ensure all information is correct before creating a task. Once a task is created, it can only be cleared from the dispatch. It cannot be edited or deleted. |
Method 1 - Create Panel
To create a task from the Create Panel:
Click
 Create in the ribbon.
- Fill in the necessary fields to create a dispatch.
- Click
 Add Officer Tasks.
 - Enter a description in the Task Description field.
 The Dispatch Tasks section of the Create Dispatch window. This section appears after clicking Add Officer Tasks.
 Optional: Enter search criteria in the Assign Tasks To field to search for the officer you wish to assign the task to.

You can assign an officer to a task after it’s created. See Assign an Officer to a Task for more information. Select a location using one of the following methods (if you want to select an indoor location point, see step 7):
- Enter search criteria in the Search locations field, then select the location from the search results;
- Click the
 icon, then click a location pin on the map; or
 Create a new temporary location by clicking a global address from the search results (if enabled) or the
 icon in the Search locations field, clicking a location on the map to place a pin, then entering a name in the Location name field (formerly the Search locations field). You will not be able to create temporary locations unless you have the appropriate permissions in your profile.
Before creating a new location, see Quick Add Temporary Locations for important information.
To select an indoor location point, choose one of the following methods:
- Enter search criteria in the Search locations field, then select the indoor location from the search results; or
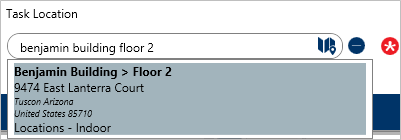 Enter search terms in the Search locations field to select an indoor location point.
 - Click the
 icon in the Search locations field, click a pin on the map or enter search terms to select a location with indoor location points, then click Indoor Location Points at the bottom right of the map. Click the
  pin(s) to open an indoor location. If needed, double-click the image to place a temporary
  pin to indicate the exact location of the dispatch, which will appear as the
  icon for dispatchers when viewing the indoor location through the Map panel (the color of the icon is determined by the dispatch’s priority color, if any).
 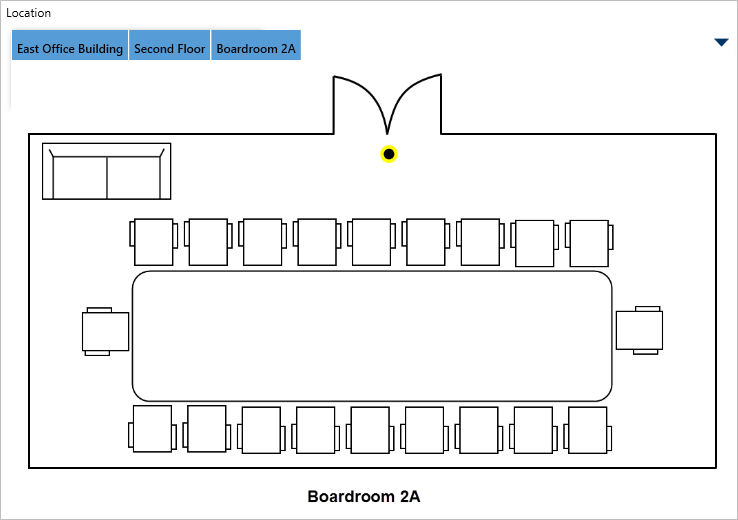 A temporary pin placed on an indoor location point image.
Return to previous location points by clicking the blue tabs at the top-right or the  icon at the top left to return to the map.
- Enter search criteria in the Search locations field, then select the indoor location from the search results; or
- Repeat steps 3-7 to create more officer tasks as needed.
 Create in the ribbon.
 Add Officer Tasks.

 icon, then click a location pin on the map; or
 icon in the Search locations field, clicking a location on the map to place a pin, then entering a name in the Location name field (formerly the Search locations field). You will not be able to create temporary locations unless you have the appropriate permissions in your profile.

 icon in the Search locations field, click a pin on the map or enter search terms to select a location with indoor location points, then click Indoor Location Points at the bottom right of the map. Click the
  pin(s) to open an indoor location. If needed, double-click the image to place a temporary
  pin to indicate the exact location of the dispatch, which will appear as the
  icon for dispatchers when viewing the indoor location through the Map panel (the color of the icon is determined by the dispatch’s priority color, if any).
 icon at the top left to return to the map.
Method 2 - Create Task Panel
To create a task from the Create Task panel:
Click a dispatch in the Dispatches panel to select it.
- Click
 Create Task in the ribbon.
 - Enter a description of the task in the Task Description field.
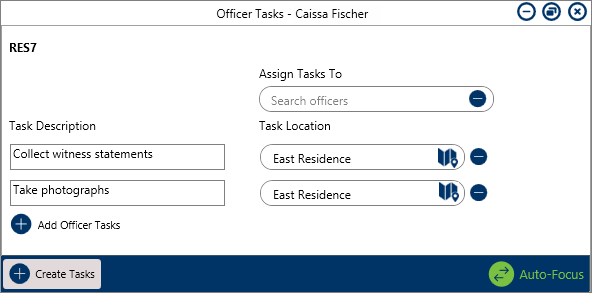 The Create Tasks (Officer Tasks) panel. The dispatch number of the selected dispatch is displayed in the top-left corner and the location of the dispatch is automatically populated in the Task Location field.
 - Optional: Enter search criteria to locate the record of an officer in the Assign Task To field.
You can assign an officer to a task after it’s created. See Assign an Officer to a Task for more information. Optional: If the task is not at the same location as the dispatch, use one of the following methods to select a location (if you want to select an indoor location point, see step 6):
- Enter search criteria to select a location in the Task Location/Search locations field, then select the location from the search results;
- Click the
 icon in the Task Location/Search locations field to open the map, then click a pin on the map to select that location; or
 - Create a new temporary location by clicking a global address from the search results (if enabled) or the
 icon in the Search locations field, clicking a location on the map to place a pin, then entering a name in the Location name field (formerly the Search locations field). You will not be able to create temporary locations unless you have the appropriate permissions in your profile.
Before creating a new location, see Quick Add Locations for important information.
To select an indoor location point, choose one of the following methods:
- Enter search criteria in the Task Location/Search locations field, then select the location from the search results;
 Enter search terms in the Search locations field to select an indoor location point.
 - Click the
 icon in the Search locations field then:
Open a location with indoor location points.
- Click Indoor Location Points at the bottom right of the map.
- Click the
 pin(s) to open an indoor location, then double-click the image to place a temporary pin (
 ) to select the indoor location and indicate the exact location of the dispatch.
Temporary pins appear as a icon for dispatchers when viewing the indoor location through the Map panel (the color of the icon is determined by the dispatch’s priority color, if any).
 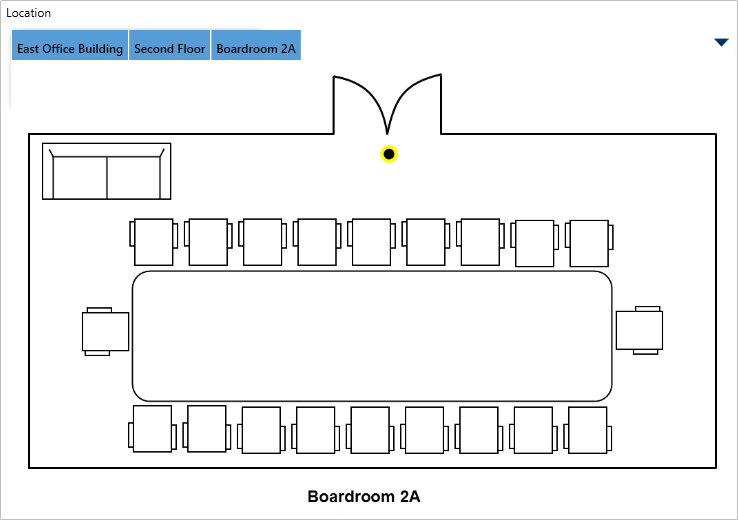 A temporary pin placed on an indoor location point image.
Return to previous location points by clicking the blue tabs at the top-right or the  icon at the top left to return to the map.
- Enter search criteria in the Task Location/Search locations field, then select the location from the search results;
- Optional: Click
 Add Officer Tasks and repeat steps 3-6 to add more tasks as needed.
 Click
 when finished.
 Create Task in the ribbon.
 icon in the Task Location/Search locations field to open the map, then click a pin on the map to select that location; or
 icon in the Search locations field, clicking a location on the map to place a pin, then entering a name in the Location name field (formerly the Search locations field). You will not be able to create temporary locations unless you have the appropriate permissions in your profile.
 icon in the Search locations field then:
 pin(s) to open an indoor location, then double-click the image to place a temporary pin (
 ) to select the indoor location and indicate the exact location of the dispatch.
 icon for dispatchers when viewing the indoor location through the Map panel (the color of the icon is determined by the dispatch’s priority color, if any).
 icon at the top left to return to the map.
 Add Officer Tasks and repeat steps 3-6 to add more tasks as needed.
 when finished.