Previous assessment data is displayed in an assessment table on a standard form. The assessment table's data is pulled from the five most recently modified instances of the object currently displayed on the form, helping users better understand how data has changed over time and across different assessments.
This table is enabled in the standard form's settings for a plain text, numeric, select list, formula, or date and time field element. To define what data displays in the form, administrators select data from the object type and assessments (properties, fields, dimensions, raw data [the numeric data of a select list] and trending data).
Users can click on data in this table to display the instance form in a palette, using either its default form, or one selected in the object type's workflow permissions. If a user doesn't have permission to view the instances, they will not appear in the table.
For example, with the assessment table enabled on a Risk object type form, opening that form for Risk 3 (e.g., R-3) will display the name and business units from the assessments that created the instances. Clicking data in a cell will open the related instance in a palette (e.g., R-3.1, R-18), allowing you to review how that risk is being assessed across the organization.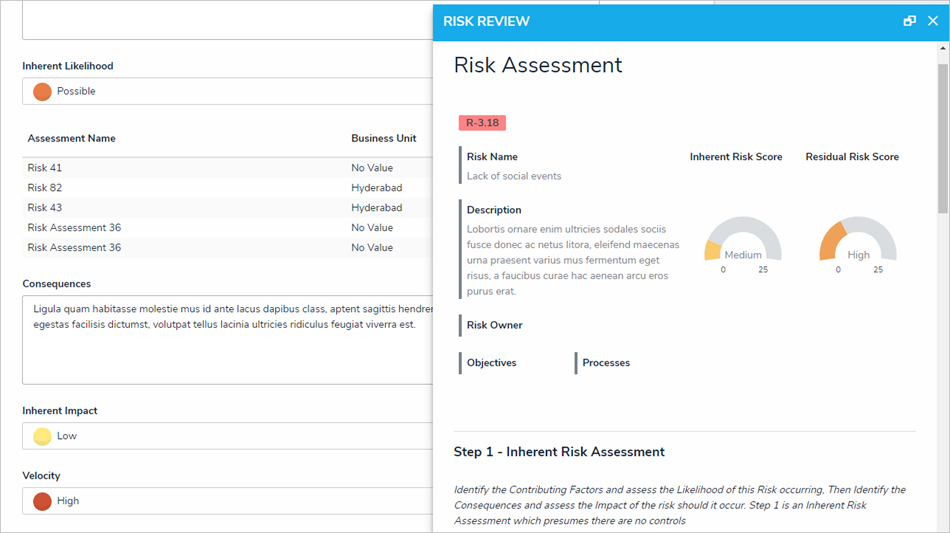 An example of the assessment table displaying an instance in a palette.
To enable the assessment table on a standard form:
- If the form is not already open, click the
 icon in the top bar > Configurable Forms > Views section, then select a form.
 - If the field has not already been added:
- Click the
 icon in the Fields section of the Form Elements palette to expand it.
 - Drag and drop a plain text, numeric, select list, formula, or data and time field to the canvas. Read more here: Fields on Forms and Add Fields to an Object Type.
- Click the
- Hover your cursor over the field, then click the
icon to display the Edit Component Display screen.
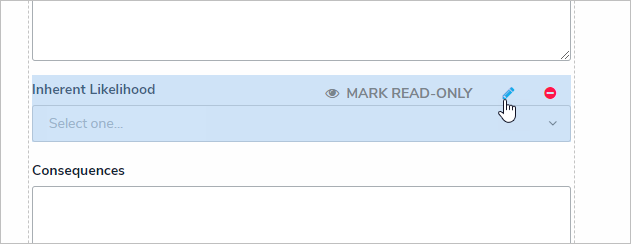 Hovering the cursor over a field on the form canvas to display the field options.
 - Click the
 icon beside Enable Assessment Table.
 - Select one of the following dropdown menu options to determine what data displays:
- Raw Value: The numeric value (with no label) of a select list field on which the table has been enabled (e.g., displaying the data from the "Control self-assessment" field in the relevant table).
- Trending: Displays up or down arrows on the form to indicate whether the field added to the table is in an upwards (higher numeric value) or downwards (lower numeric value) trend. To display trending data in this option, the other field selected in the table must contain numeric data (e.g., select lists, formulas, or numeric fields).
- Assessment Name: The name of the assessment from which the instance(s) was created.
- Properties: The properties of the assessment (e.g., Name, Unique ID, Description).
- Fields: Any fields added to the object type or assessment.
- Dimensions: The dimensions of the assessment where the instance(s) were created.
- Click Add Selected to add the option to the table.
- Continue adding options as needed.
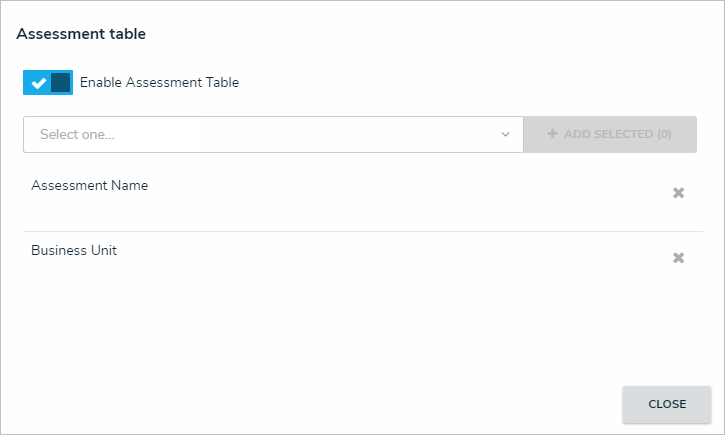 Options added to the assessment table.
- Click Close to return to the form canvas.
 icon in the top bar > Configurable Forms > Views section, then select a form.
 icon in the Fields section of the Form Elements palette to expand it.
 icon to display the Edit Component Display screen.
 icon beside Enable Assessment Table.