Once an assessment type has been created, you can add it to data visualizations, object type groups, relationships, roles, configurable forms, actions, and views.
To create a new assessment type:
- Click the
 icon in the top bar > Assessments in the Data Model section.
 - Enter a name for the assessment in the Name field.
- Optional: Enter a plural name for the assessment type in the Plural Name field, which will appear when viewing a list of the objects for the assessment (e.g., “View Control Assessments” instead of “View Control Assessment”).
- Optional: Enter a description of the assessment type in the Description field, which will appear on the Assessments and Edit Assessment pages.
The Create Assessment page. - Optional: To edit the assessment monogram:
- Click the monogram icon to the left of the Name field.
- Enter 1 to 3 characters in the Monogram field.
- Click the Pick a color dropdown menu to reveal the color picker. You can also type a hex color into this field to select a color.
The Customize Monogram screen. - Click Done.
- Click Create to display the Edit Assessment page.
- Select an object type to use as the assessment’s focus from the Choose an assessment focus dropdown menu. The focus object type determines which object types you can select when creating or selecting a data definition.
- Click Set Focus.
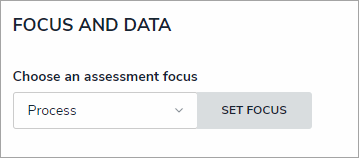 The Focus dropdown menu. The object type selected here will determine which data definition can be selected for the assessment.
Once you've clicked Set Focus, you cannot modify your selection. - To choose an existing data definition, select it from the Choose a Data Definition dropdown menu.
- To create a new data definition:
- Click Create New to open the Create Data Definition panel.
The Data Definition section, which appears after selecting a focus. - Enter the name for the definition in the Name field.
- Optional: Enter a description for the definition in the Description field. This description will appear when reviewing the Data Definition settings.
The Create Data Definition screen. - Click the monogram, which represents the focus object type you’re currently working in, to expand the node and any reveal relationships and references saved to the focus object type.
The Data Path with no object types selected. Clicking the monogram of the focus object type will expand the tree to show all the relationships and references. - Click a relationship or reference to show the related object types (e.g. clicking the “Controls” relationship will reveal the Control object type).
- Click an object type to place a checkmark next to it and add the object type to the data definition. Any object types selected in the data definition can be used as dimensions or reference data on the assessment. For example, if you selected Process as the focus and Control in the data definition, both Process and Control can be added as dimensions.
Selecting object types on a new data definition. The object types selected can then be used as dimensions or reference data.
- Continue placing checkmarks beside the object types as needed.
- Click Create to close the palette.

You can review the data path of the definition from the Data Definitions section in Administration.
- Click Create New to open the Create Data Definition panel.
- To create a dimension from an existing object type (that will appear on the assessment as a field through which users can select an existing object):
- Click the dropdown menu below Object Type Dimension(s), then select one or more object types that you want to appear on the assessment (e.g., selecting the Location object type will add fields on the assessment through which users can only select existing Location objects).
- Click Add Selected.
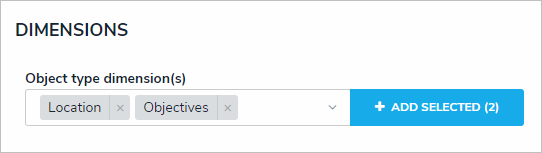 Adding object type dimensions to an assessment.
- To create a custom dimension, which will appear on the assessment as a dropdown menu with predefined options (like a select list) and will not allow users to select existing objects:
- Click Create New from the dropdown menu below Custom Dimension(s).
- Enter a name in the Dimension Name field (e.g., Location).
- Enter the name for an option as it will appear in the dimension (e.g., Edmonton).
- Click Add Another Dimension Option to continue adding options.
The Create Dimension screen for custom dimensions. - Click Create.
- Click the Configuration tab to configure the workflows and assessment data. See the Configure an Assessment's Workflows for more detailed information.
- Click the Fields tab to add fields to the assessment.
- Click the Formulas tab to add formulas to the assessment.
- Click the Relationships tab to add relationships to the assessment.
To help indicate an object type is the focus of an assessment, a relationship between the assessment and the focus object type is automatically created on the assessment, which will then allow you to add a reference on the focus object type, if needed. - Click the Roles tab to add roles and configure the inferred permissions on the assessment.
- Click Done.
- Create a navigation form to complete the scope and launch of the assessment.
- Create a standard configurable form for the assessment, ensuring you’ve added the Assessment Context element and the Open Assessment Scoping action to the form.
- Add the assessment to an action so assessment objects can be created through an activity.
- Optional: Add the assessment to a view so existing assessment objects can be viewed through an activity.
 icon in the top bar > Assessments in the Data Model section.


Overview
When assessing risk within the Risk Management applications, users must complete the following stages for the assessment: create, launch, and scope. Once an assessment has been launched, Risk Team user group members must scope it to define its required risk categories, sub-categories, risks, or controls.
If an admin has enabled the option to reuse data from other assessments and you have permission to view those objects, users must review those before the assessment is launched. See the Review Objects section below for more information.
User Account Requirements
The user account you use to log into Resolver must have Administrator permission or be part of the Risk Team user group.
Related Setup/Information
For more information on why assessments are scoped and launched, see the Scope & Launch Overview article.
To learn more about the user interface of the scoping tool, see the Scope & Launch User Interface article.
Please refer to the Rely on Previous Assessment Data article for more information on linking previous assessments to a new assessment.
Please refer to the Link to Existing (Rely On) Assessment Data article for more information on reusing data from other assessments.
Please refer to the Reviewing Assessment Objects article for more information on reviewing assessment objects before launching an assessment.
Navigation
- From the Home screen, click the Home dropdown menu.
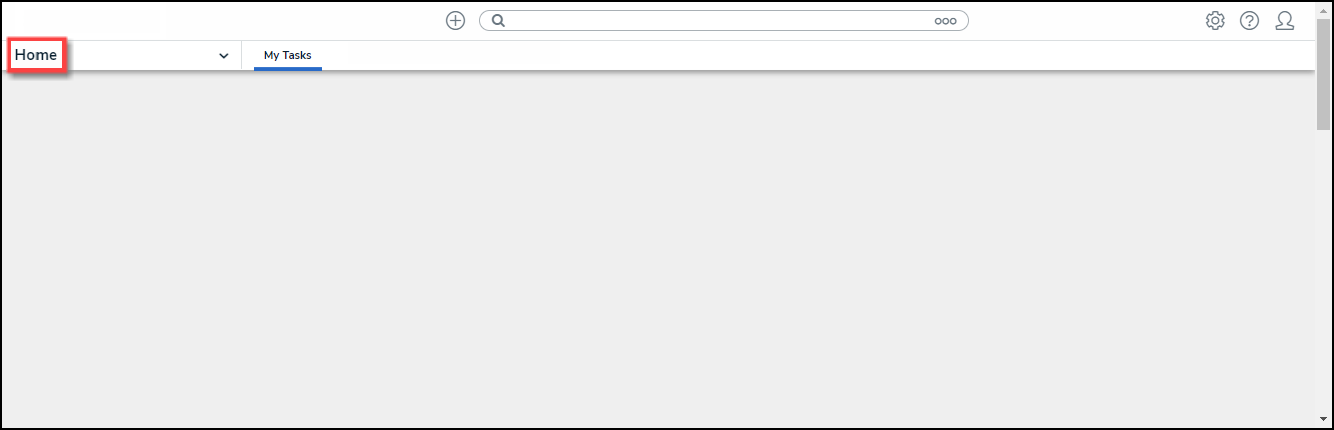
Home Dropdown Menu
- Select Risk Management from the dropdown menu.
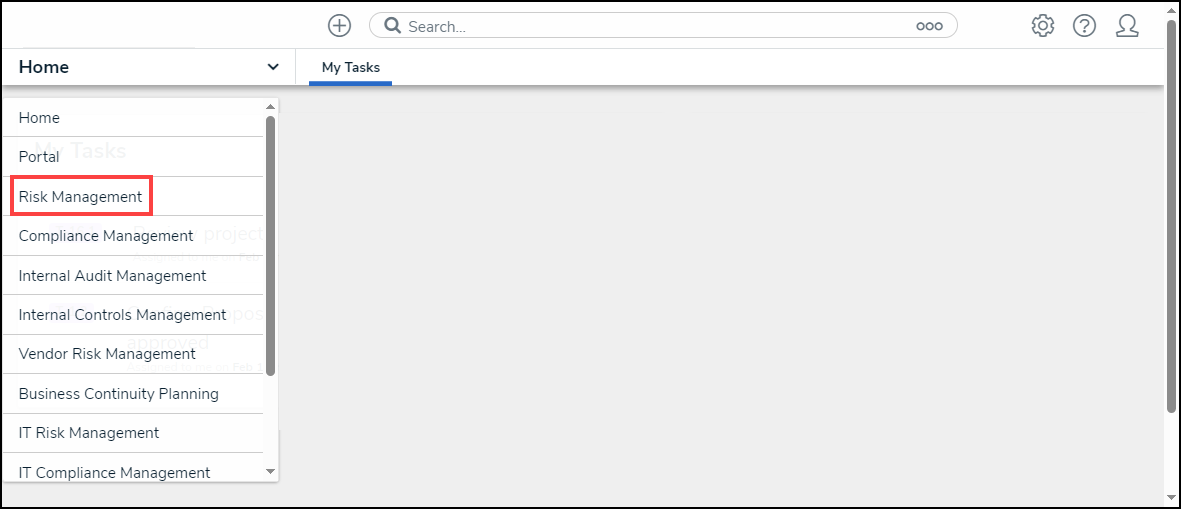
Risk Management
- From the Identify Risk screen, click the Launch Risk Assessment tab.
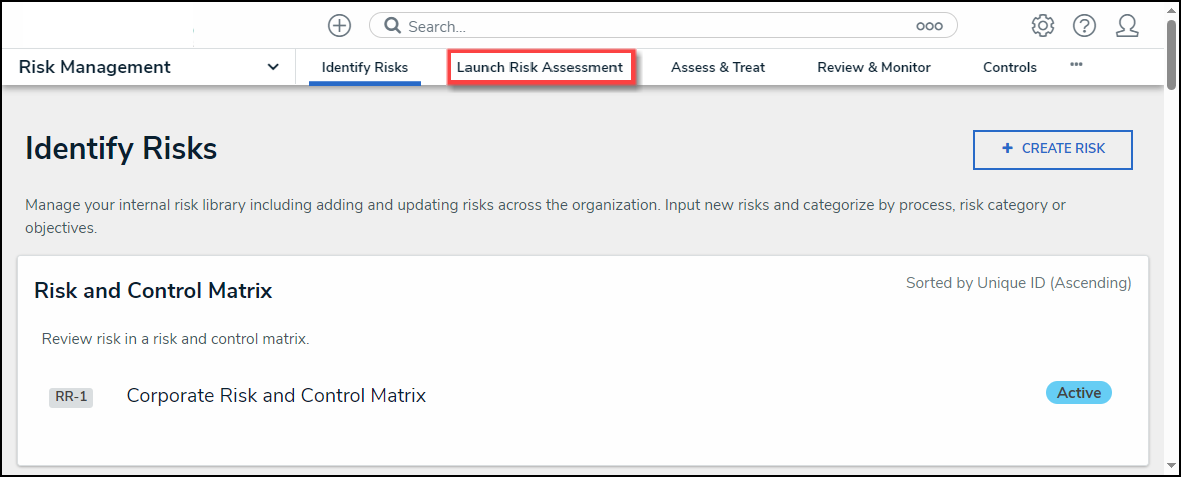
Launch Risk Assessment Tab
- From the Launch Risk Assessment screen, click the + Launch Risk Assessment button.

+ Launch Risk Assessment Button
Launching an Assessment
- From the Create a New Risk Assessment screen, enter a name for the Risk Assessment in the Risk Assessment Name field. The Risk Assessment name identifies the Risk Assessment throughout the system.

Risk Assessment Name Field
- Enter a brief description outlining the Risk Assessment in the Description field. The Description field allows you to enter additional information about the Risk Assessment.

Description Field
- Enter a business unit name in the first Business Unit field and select a business unit from the dropdown menu. The first Business Unit field is the Dimension field and tags data. Selecting the Dimension will tag the data with the appropriate business unit to help identify similar objects.
- Enter the business unit used in the first Business Unit field in the second Business Unit field and select a business unit from the dropdown menu. The second Business Unit field is for reporting and establishes a link between the business unit and assessment.

Business Unit Fields
- Click the Create button to create the assessment.
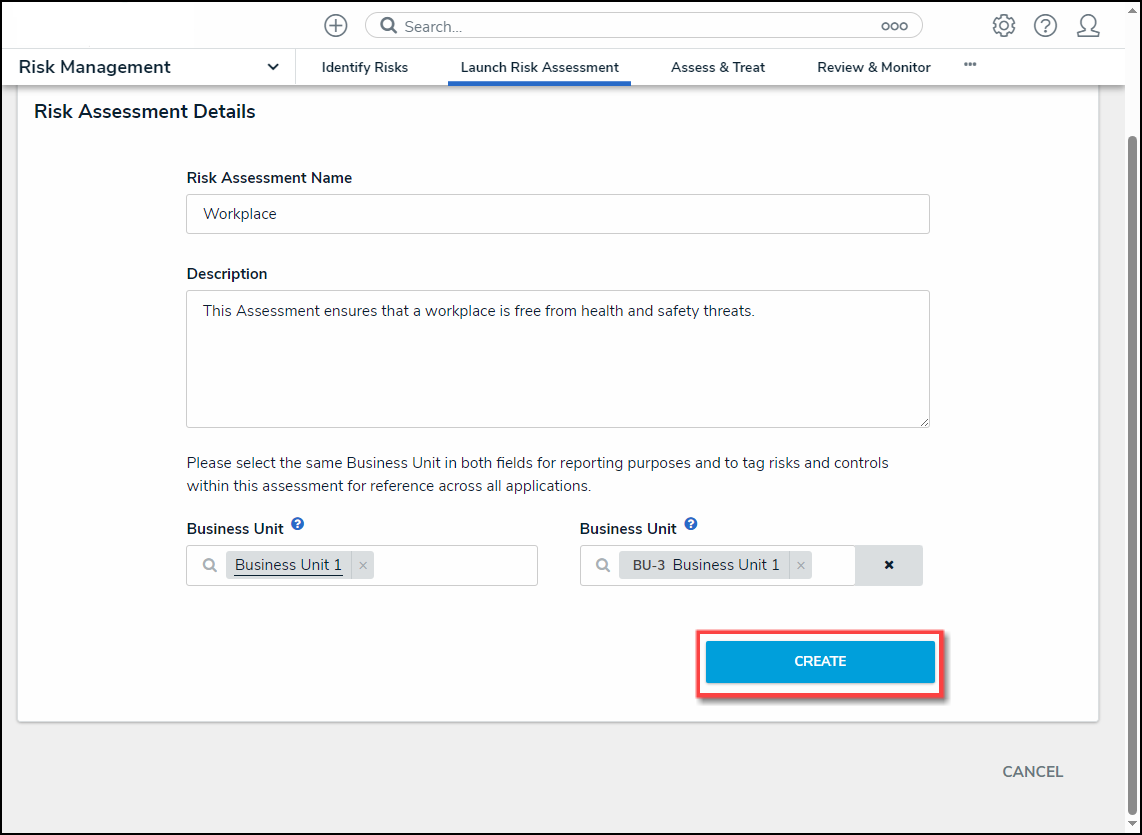
Create Button
Scoping an Assessment
- From the Risk Assessment Details tab, click the Define Scope of RSCA button to add risks and controls to the assessment.
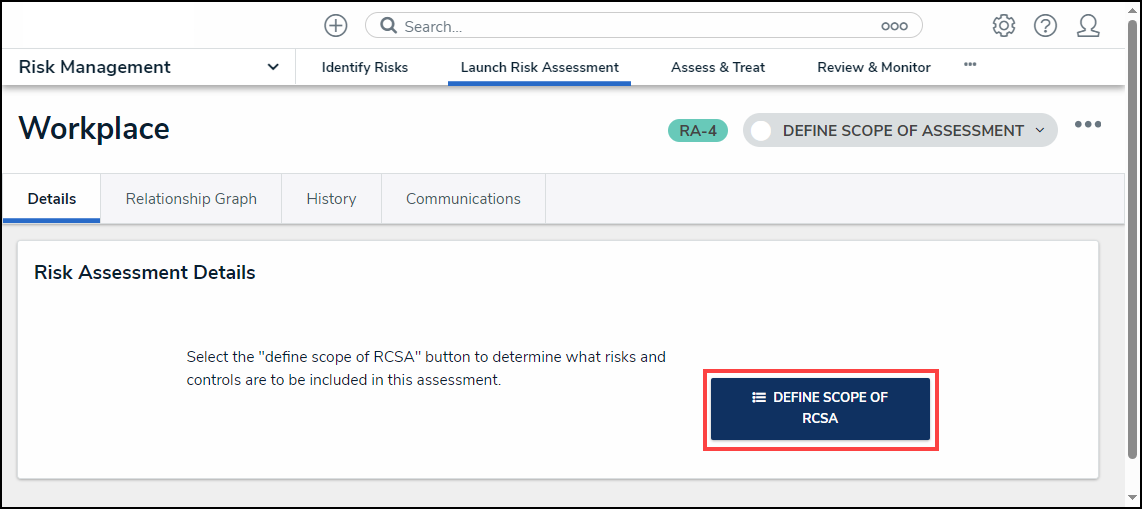
Define Scope of RSCA Button
- The Risk Assessment screen will appear.

Risk Assessment Screen
- (Optional) Use the Filter fields to narrow the search results by entering the corresponding keyword in the Filter field (e.g., Library in the By Assessment Type field) and selecting a filter from the dropdown list.

Filter Fields
- Click the Delete (x) icon next to a filter on a Filter field to remove a filter.
![]()
Delete Icon
- Click the +Add link on risk categories, processes, or objectives to create the assessment focus. Users can select multiple risk categories, processes, or objectives to add to the assessment.
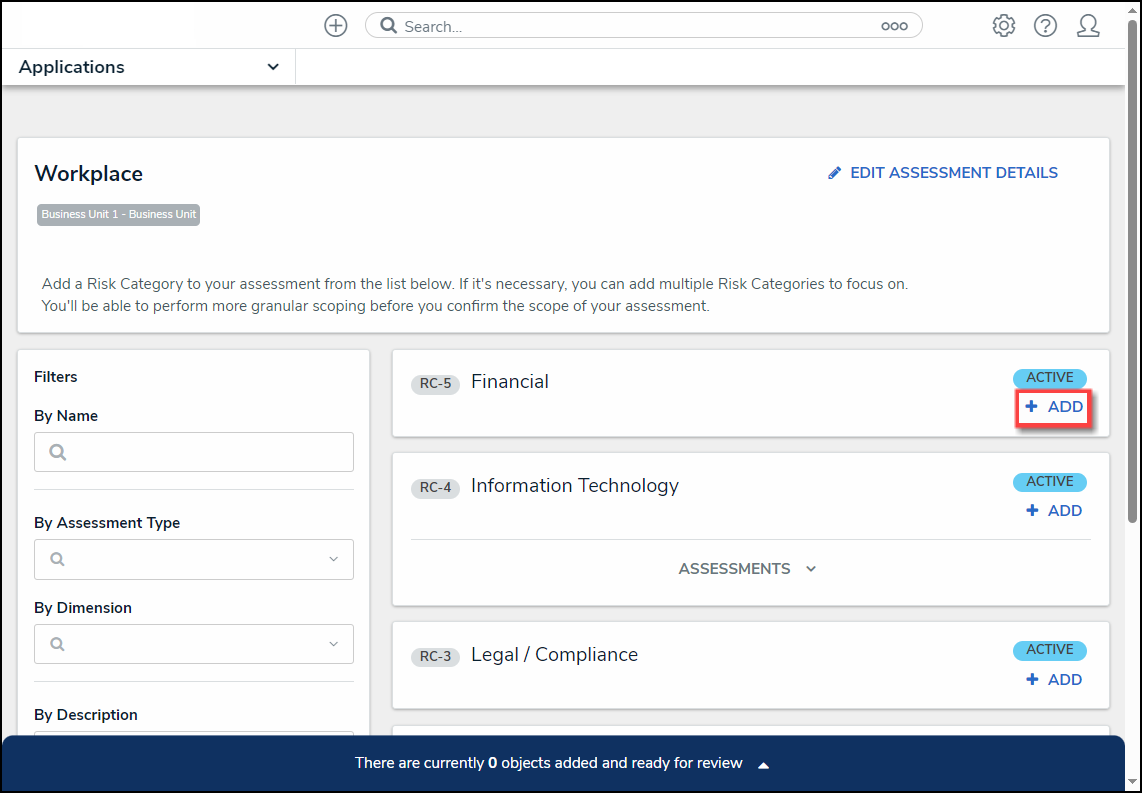
+ Add Link
- An Assessment dropdown menu link will appear under an object if the object has previous assessments.
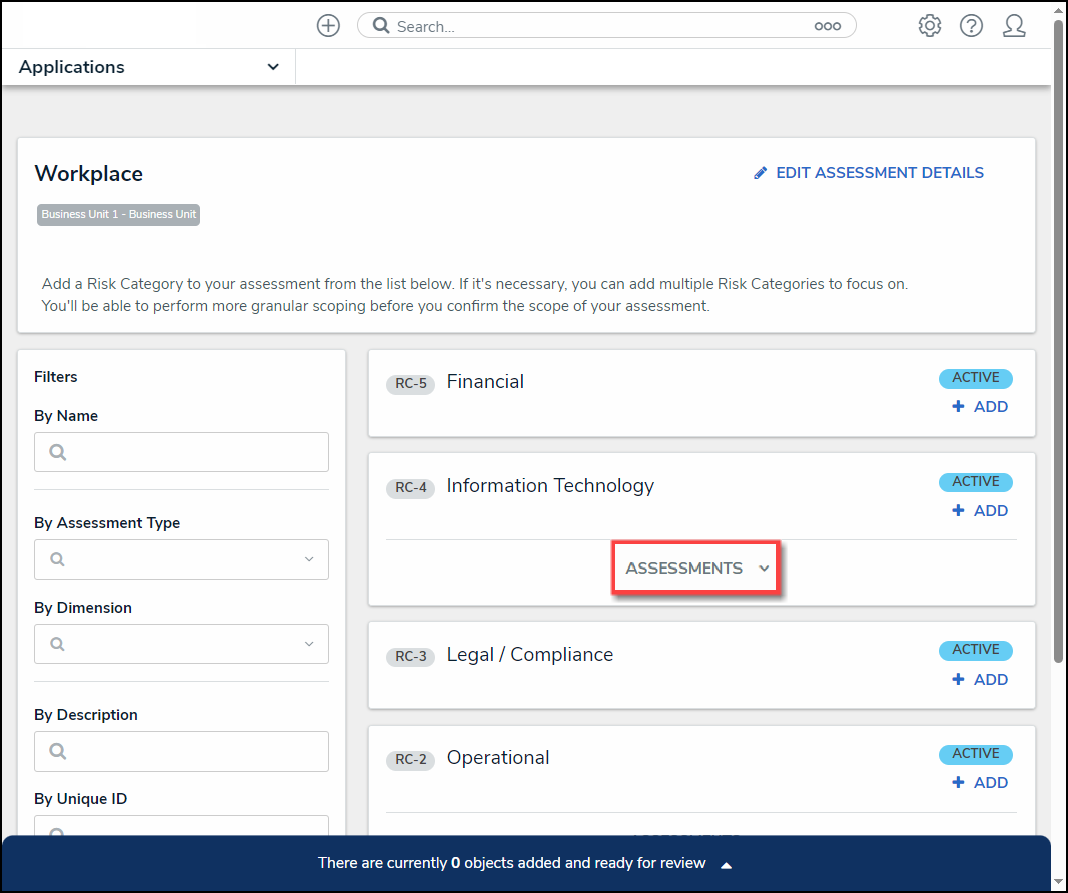
Assessment Dropdown Link
- Click the Assessment dropdown menu to view the object's previous assessments.
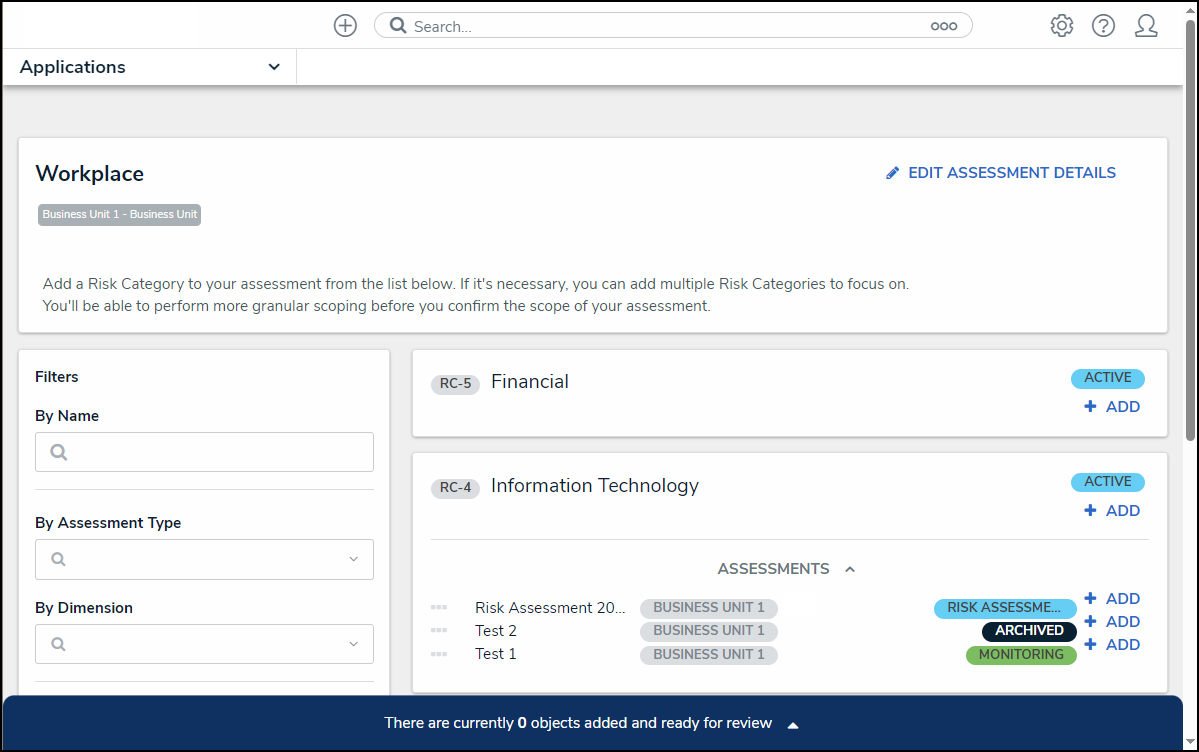
Assessment Dropdown Menu
- Click on the + Add link next to an assessment to add a previously assessed object to the new assessment.

+ Add Link
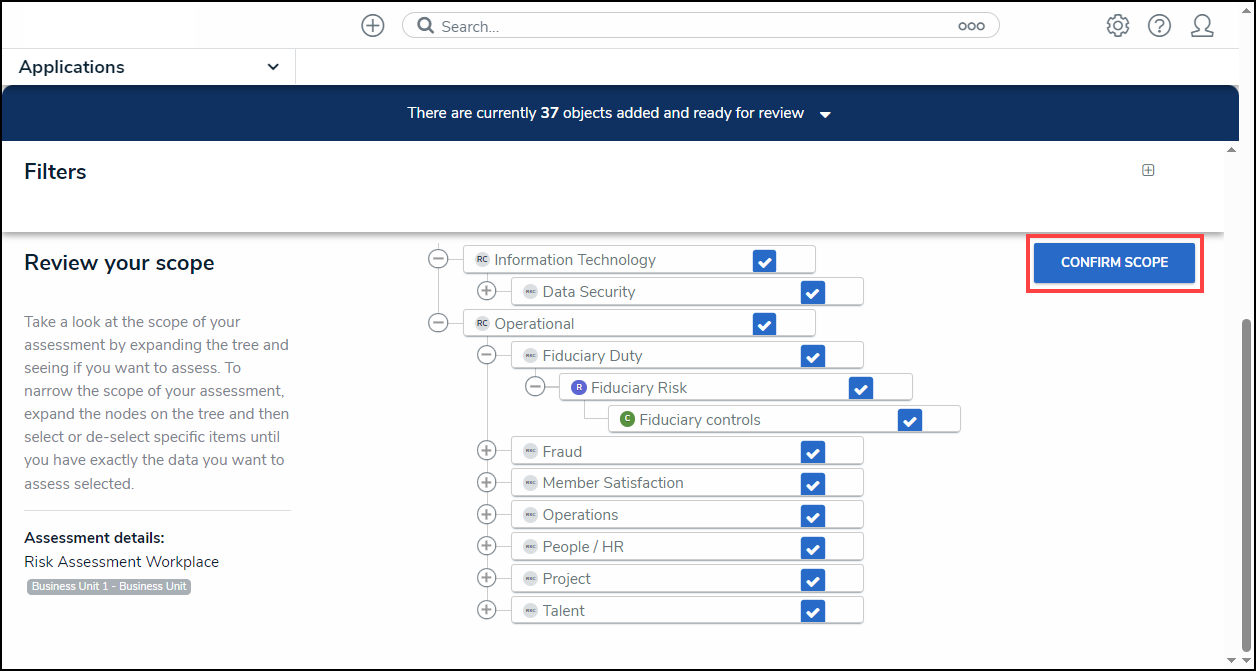
- As you add risk categories, processes, or objectives, the banner at the bottom of the screen will track the number of objects added to the assessment for review.
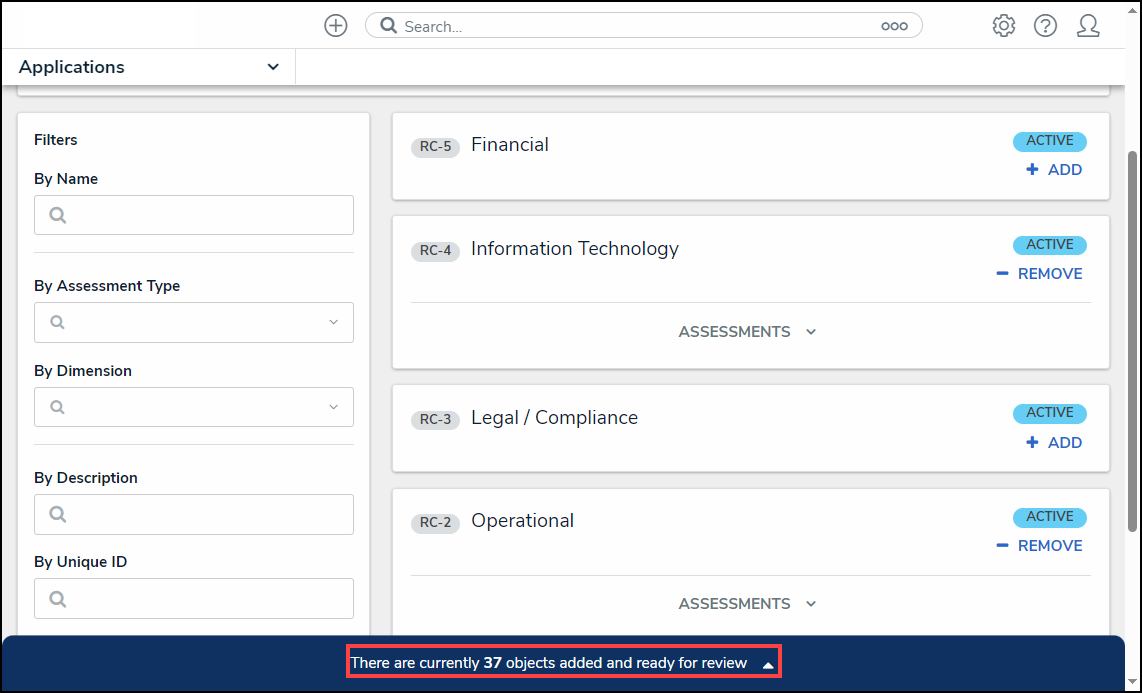
Banner
- Click the Banner Arrow to open the Assessment Scope screen.

Assessment Scope Screen
- (Optional) Click the Expand icon in the Filters section and select an Object Type from the Select Object Type to Filter Tree With dropdown menu to show the available plain text, select list, and property filters for that object type. The Navigation Tree will be filtered using the object type selected from the Select Object Type to Filter Tree With dropdown menu.

Select Object Type to Filter Tree with Dropdown Menu
- (Optional) Use the Filter fields to narrow the search results by entering the corresponding keyword in the Filter field (e.g., Creation in the By State field) and selecting a filter from the dropdown list.

Filter Fields
- Review the assessment's scope by clicking the Expand icons on the Navigation Tree Nodes to review the object's relationships and references. Data Definitions determine the objects that appear on the Navigation Tree.
![]()
Expand Icon
- By default, all objects and their relationships and references are automatically selected, including them in the assessment scope. Deselect the checkbox next to an object to remove it from the assessment's scope.
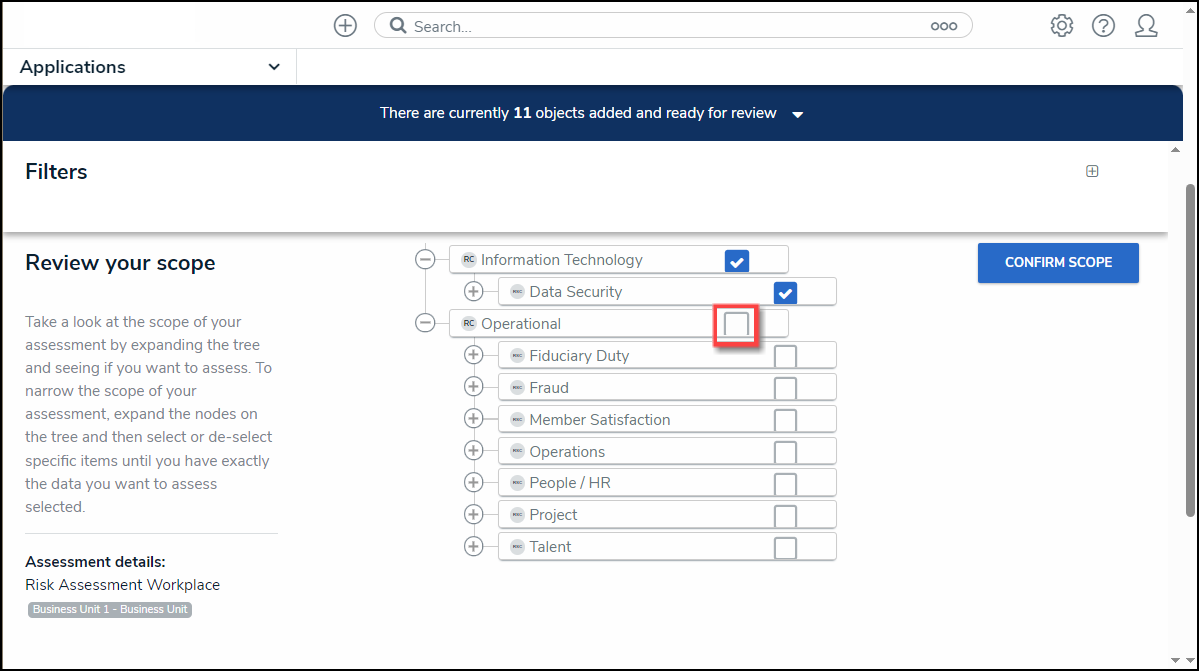
Object Checkbox
- Deselecting an object in an upper node will automatically deselect the objects in the sub-nodes below it.

Deselected Sub-Nodes
- Click an Object Name.

Object Name
- Depending on the Object (e.g., relationship, references, risk, or control) selected, a pop-up listing more detailed object information will appear. Users may be able to edit the object's content form, depending on their role's workflow permissions.

Pop-up
- After you have reviewed the assessment scope, click the Confirm Scope button.
Confirm Scope Button
- The Confirm Scope pop-up will appear, indicating the number of objects in the assessment and if the option to link to existing assessments exists.

Confirm Scope Pop-up
- Click the Confirm Scope button to confirm the assessment's scope and launch the assessment.

Confirm Scope Button
- If you created the assessment and accessed it from a view, the form selected for that view will be displayed after clicking the Confirm Scope button. Otherwise, the form used to create the assessment initially will be displayed.
- If an Administrator enabled the Link to Existing feature on the Configuration tab on the Admin: Editing Assessment screen, and you have the appropriate user permissions. Clicking the Confirm Scope button will open the Review Objects screen, allowing the user to review the data before the assessment is launched.
 Related Information/Setup:
Please refer to the Activating the Link to Existing Feature article for more information on reusing data from other assessments.

Review Options Screen
The Open Assessment Rescoping form action provides access to the scoping tool where users can review, filter, and add objects to an already launched assessment, at any time, without interrupting the current workflow of that assessment. This includes Link to Existing assessment objects as well as creating new assessment objects.
Open Assessment Rescoping uses the same process when initially creating and scoping an assessment.
Any object already scoped to the assessment will display the word ADDED and can’t be added or removed using the Assessment Rescoping action.
When reviewing objects for rescoping, in the Review Your Scope screen, child objects can be viewed and selected to be added to the launched assessment.
Assessment objects that were unlinked from a launched assessment can be linked back to the launched assessment using a Relationship table. When configuring a relationship on a form, Enable Search and optionally Enable Advanced, are to be configured to display the ADD EXISTING option on a form. Add existing will then allow a user to search for library and assessment objects to link to the Assessment, based on that user's permissions.
For more information on Assessment Data, see the Assessment Data Reference Data article.
Deleting an assessment type will also delete all objects and instances associated with the assessment. To delete an assessment type, you must have:
- Administrative privileges enabled on your user account; and
- The assessment type added to your role with Delete permissions enabled for all states for the assessment type and object types included in the assessment OR All Access enabled on your user account.
To delete an individual assessment object and its instances, see the Delete a Launched Assessment Object article. To delete an assessment that has not yet been launched, see Edit or Delete an Assessment.
To delete a launched assessment type:
- Click the icon in the top bar > Assessments in the Data Model section.
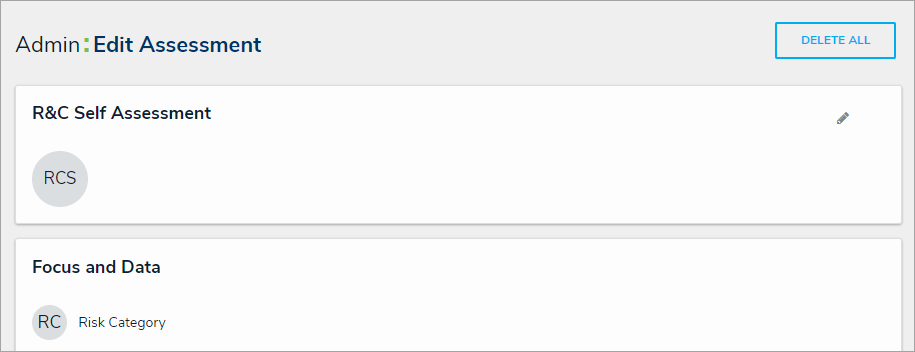
- Click the assessment or enter the name of the assessment in the Search field, then click it to display the Edit Assessment page.
- Click Delete All at the top-right of the page to the Confirm Delete screen.
 The Delete All option on the Edit Assessment page.
If Delete All is not visible, ensure your account has admin privileges. Additionally, Delete permissions must be enabled on your role for all the assessment workflow states OR All Access must be enabled on your account. - Type yes in the text field (not case-sensitive), then click Delete ALL.

Deleting an assessment will delete all its objects and instances. Referenced objects mapped to the assessment are not deleted.


Deleting an assessment object will delete the individual object, together with any instances and links to reference data. To delete an assessment object, you must have:
- Administrative privileges enabled on your user account; and
- The assessment type added to your role with Delete permissions enabled for all states for the assessment type and object types included in the assessment OR All Access enabled on your user account.
Deleting an assessment object will not delete the assessment type. To delete a launched assessment type and all its objects and instances, see the Delete a Launched Assessment article. To delete an assessment that has not yet been launched, see Edit or Delete an Assessment.
To delete an assessment object:
- Open the assessment object by navigating to it in a view or using the search tool.
- Click the ellipses icon at the top-right of the form, then click Delete.
 The ellipses icon on the Assessment object form.
- On the Confirm Delete screen, review and type in the number of objects to be deleted to confirm their deletion.
Referenced objects mapped to the assessment are not deleted.
