To create a new object type:
- Click the
 icon in the top bar > Object Types in the Data Model section.
 - Click Create Object Type.
- Enter a name for the object type in the Name field.
- Optional: Enter a plural name for the object type, which will appear when viewing a list of the objects for that type (e.g. “View Incidents” instead of “View Incident”).
- Optional: Enter a description of the object type, which will appear on the Edit Object Type page when editing the object type.

The Create Object Type page. - Optional: To customize the object type monogram:
- Click the monogram icon to the left of the Name field.
- Enter 1 to 3 characters in the Monogram field.
- Click the Pick a color dropdown menu to reveal the color picker. You can also type a hex color into this field to select a color.

The Customize Monogram screen. 
The monogram is used to help you quickly identify an object type throughout CORE. If you’re creating multiple similar object types (e.g. Incidents and Incident Review) you may want to apply the same or similar colors to their monograms to help create a theme. - Click Done.
- Click Create to display Edit Object Type page.

A new object type. By default, new object types do not have any workflows, concatenations, or components.
 icon in the top bar > Object Types in the Data Model section.


To create a new object type group:
- Click theicon in the top bar > Object Type Groups in the Data Model section.
- Click Create Object Type Group.
- Enter a name for the object type in the Name field.
- Optional: Enter a brief description of the object type group in the Long Name field, which will appear below the object type when editing it.
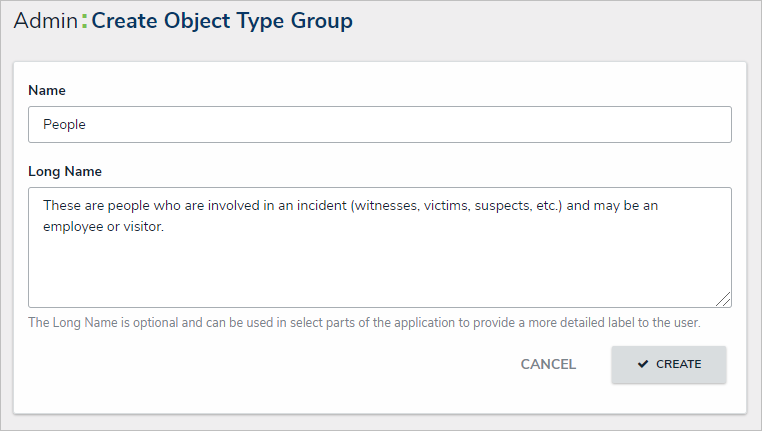 The Create Object Type Group page.
 - Click Create to display the Related Object Types section.
- In the field in the Related Object Types section, enter the name of the object type you want to add or select it from the dropdown menu. Continue to add more object types as needed.
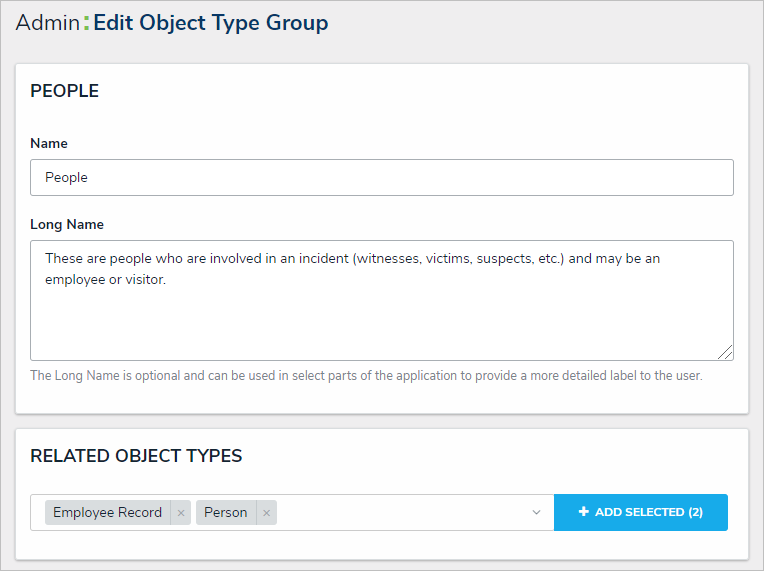 A new Object Type Group. After clicking Create, the Related Object Types section is displayed.
- Click Add Selected.
- Click Done when finished.


Overview
Administrators can edit or delete object types from your org.
 Warning:
If any data has been saved to or associated with an object type, it’s strongly recommended that you do not delete it.
User Account Requirements
The user must have Administrator permissions in order to access the Admin Overview section.
Related Information/Setup
Please refer to the Object Types Overview article for more information on object types.
Please refer to the Delete an Object article to learn more about deleting objects before deleting an object type.
Please see the Edit or Delete a State article for further information on editing an object type's workflow.
Please refer to the Add Concatenation to an Object Type article for further information on editing an object type's concatenation.
Navigation
- From the Home screen, click the Administration icon.

Administration Icon
- From the Administrator Settings menu, click Admin Overview.

Administrator Settings Menu
- From the Admin Overview screen, click the Object Types tile under the Data Model section.

Object Types Tile
- From the Admin: Object Types screen, enter a keyword in the Search field to narrow the Object Types list.

Search Field
- Click the Object Type you wish to edit or delete.

Object Type Name
Editing an Object Type
- From the Admin: Edit Object Type screen, click the Edit icon beside the object type’s name to edit the object type’s name, description, or monogram.
![]()
Edit Object Type Icon
- Edit the object type's Name, Plural Name, and Description by clicking on a corresponding field and entering a new value.

Edit Name Fields
- Click on the object type's Monogram.

Monogram
- From the Customize Monogram pop-up enter a new value in the Monogram field.

Monogram Field
- Click the Pick a Color field and select a different color from the dropdown color picker.

Pick a Color Field
- From the Workflow tab, click on the Configure Workflow button to edit the object type's workflow. Please see the Edit or Delete a State article for further information on editing an object type's workflow.

Configure Workflow Button
- Click the Concatenations tab.

Concatenations Tab
- From the Concatenations tab, click on the Configure Name Concatenation or Configure Description Concatenation links to edit a concatenation. Please refer to the Add Concatenation to an Object Type article for further information on editing an object type's concatenation.

Concatenation Links
- Click the tabs to edit, add, or delete the components added to the object type.
- Overview Tab: The Overview tab summarizes the related forms, object type groups, activities, applications, reports, and report definition connected to the object type.
- Fields Tab: The Fields tab displays the fields that are connected to the object type. The Fields tab allows you to add fields to or unlink fields from the object type. Please refer to the Add Fields to an Object Type article for information on adding a field to an object type.
- Formulas Tab: The Formulas tab displays the formulas connected to the object type. The Formulas tab allows you to add fields to or delete formulas from the object type. Please refer to the Create Formulas on an Object Type article for information on adding a formula to an object type.
- Relationships Tab: The Relationships tab displays the relationships connected to the object type. The Relationships tab allows you to add relationships to or delete relationships from the object type. Please refer to the Create Relationships on an Object Type article for information on adding a relationship to an object type.
- References Tab: The References tab displays the object type's references which indicates that an object is connected to another object through a relationship.
- Roles Tab: The Roles tab displays the roles connected to the object type. The Formulas tab allows you to add fields to or delete formulas from the object type. Please refer to the Add Roles to an Object Type article for information on adding a role to an object type.
- Click on a Field, Formula, Relationship, or Role link (under its corresponding tab) to edit an existing object connected to the object type.

Formula Link
- Click on the Delete or Unlink icon to delete or remove the corresponding object from the object type.
![]()
Delete Icon
- Click the Done button when you are finished.

Done Button
Deleting an Object Type
- Before deleting an object type, you must delete all objects associated with it.
- To delete the object type, click the Delete icon.

Delete Icon
- Click the Delete button to confirm.

Delete Button
To edit or delete an object type group:
- Click theicon in the top bar > Object Type Groups in the Data Model section.
- Click the object type group you want to edit to display the Edit Object Type Group page.
- Enter an alternate name in the Name or Long Name fields, as needed.
- To add an additional related object type, enter the name of the object type you want to add or select it from the dropdown menu in the Related Object Types section, then click Add Selected.
- To remove a related object type, click the
icon next to that object type.
- To delete the object type, click the
icon, then click Yes to confirm.
- Click Done when finished.
 icon next to that object type.
 icon, then click Yes to confirm.
Overview
Depending on their role permissions, both Administrators and users can delete objects. However, before an object can be deleted, you must review the Deletion Request warning, which outlines how deleting that specific object impacts other objects connected through relationships or references.
User Account Requirements
The user must have Delete Object permissions to delete objects.
Deleting an Object
 Warning:
Deleting an object with relationships or references will delete that object’s connection to those other objects, but it will not delete the other objects to which it was related.
- Open the object you want to delete in full screen mode.
 Note:
Note:
An object can only be deleted in full screen mode.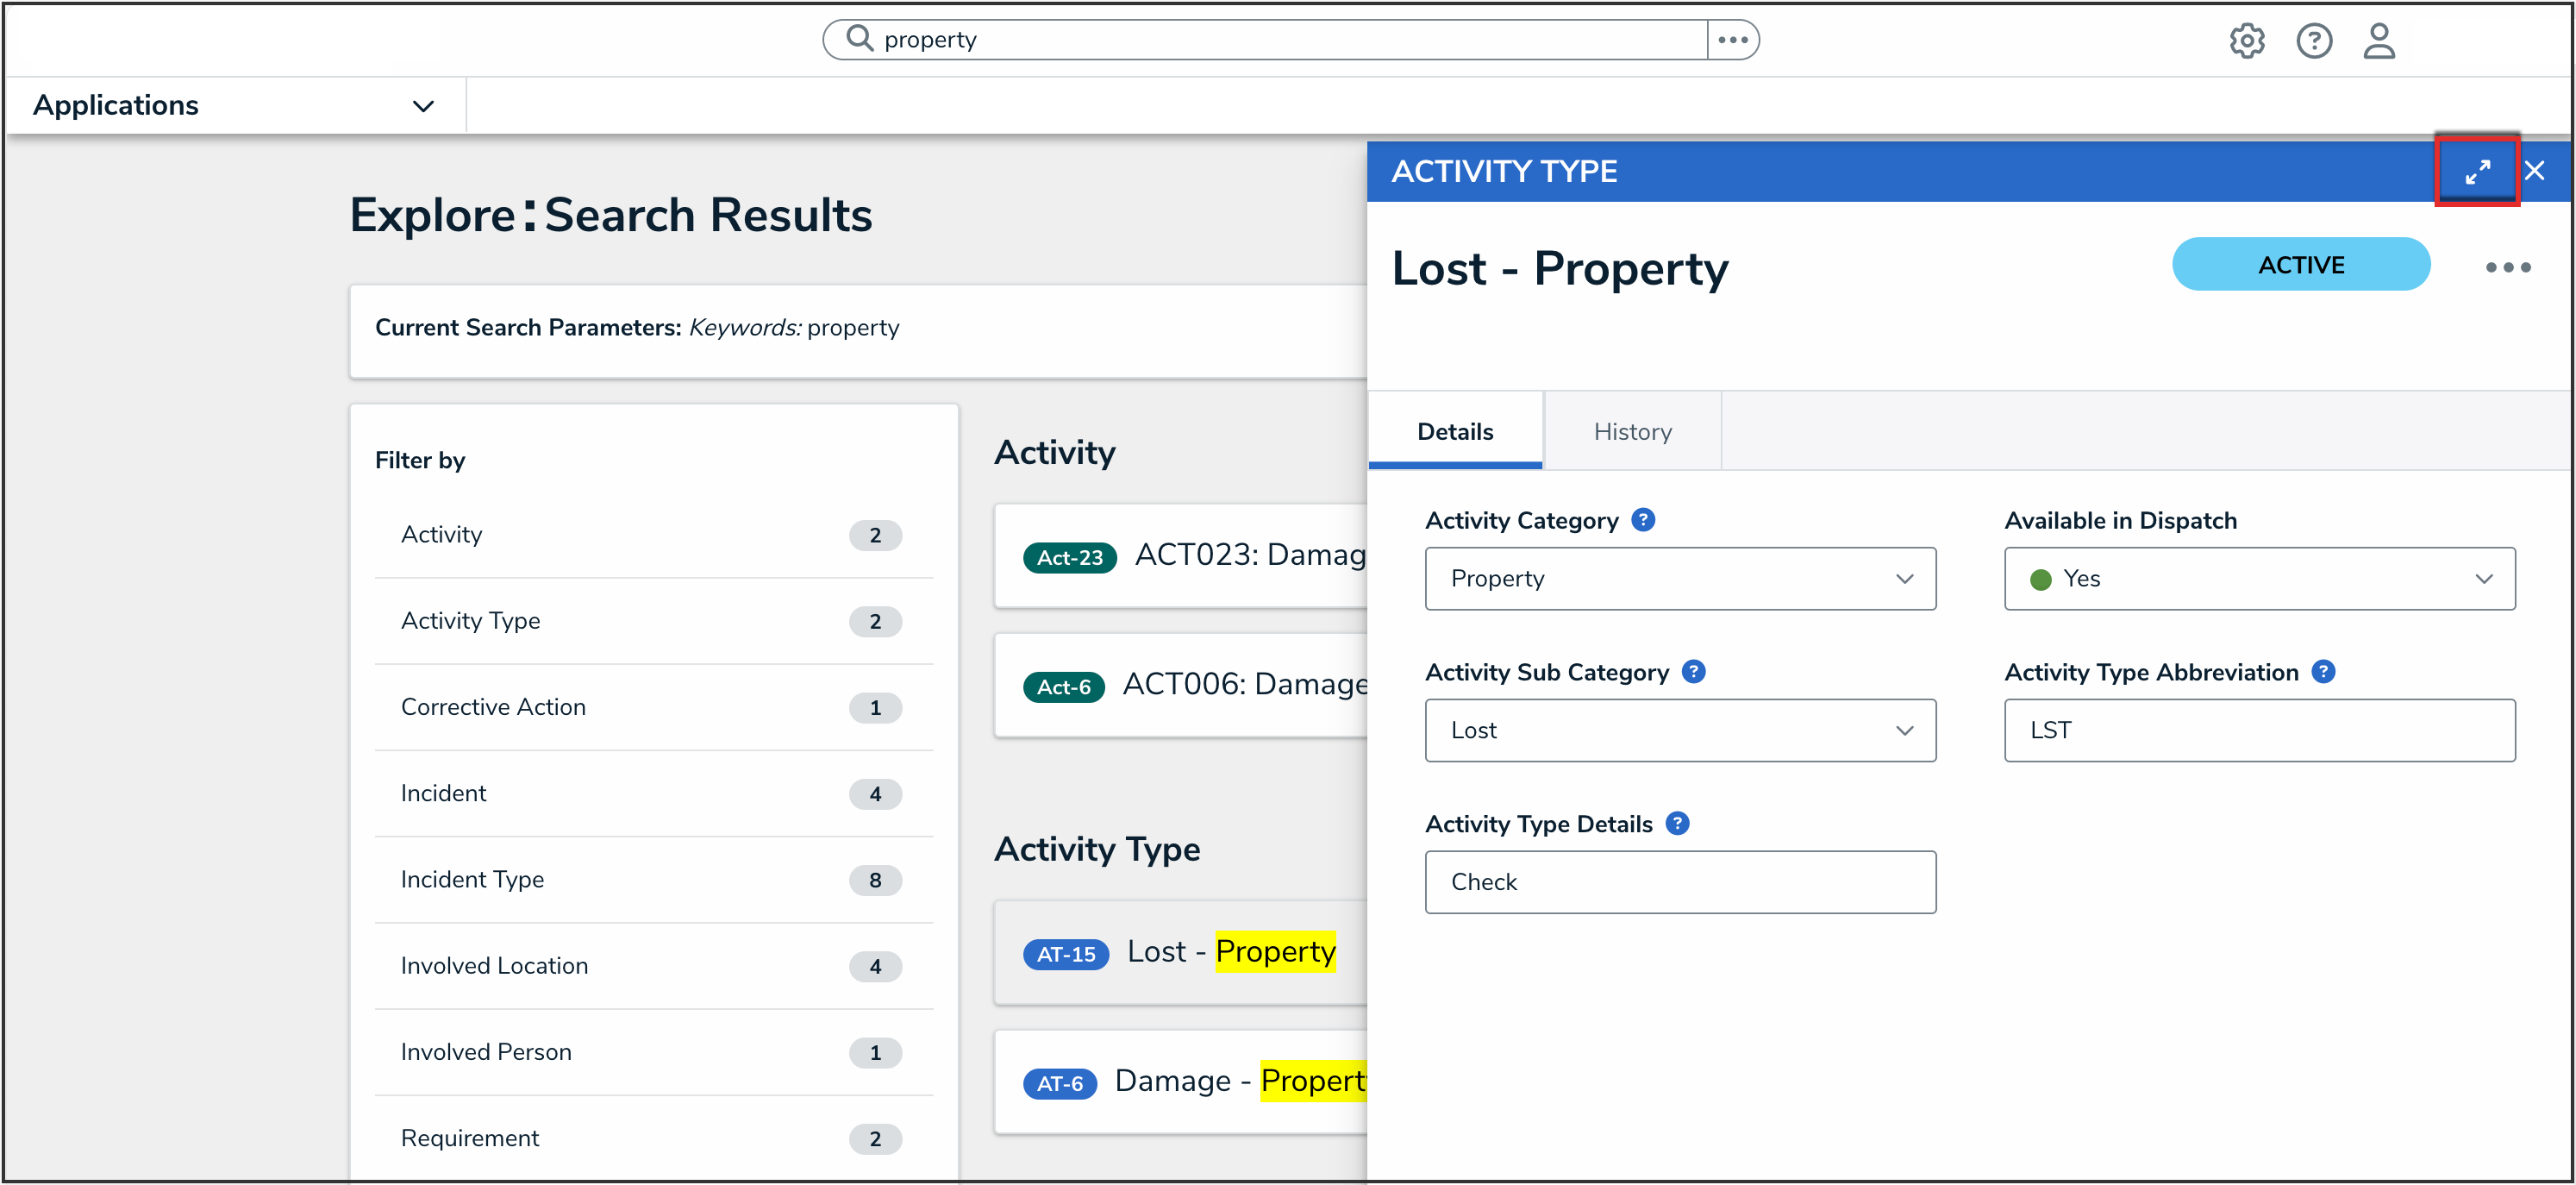
Full Screen Icon
- From the object, click the More Actions icon.
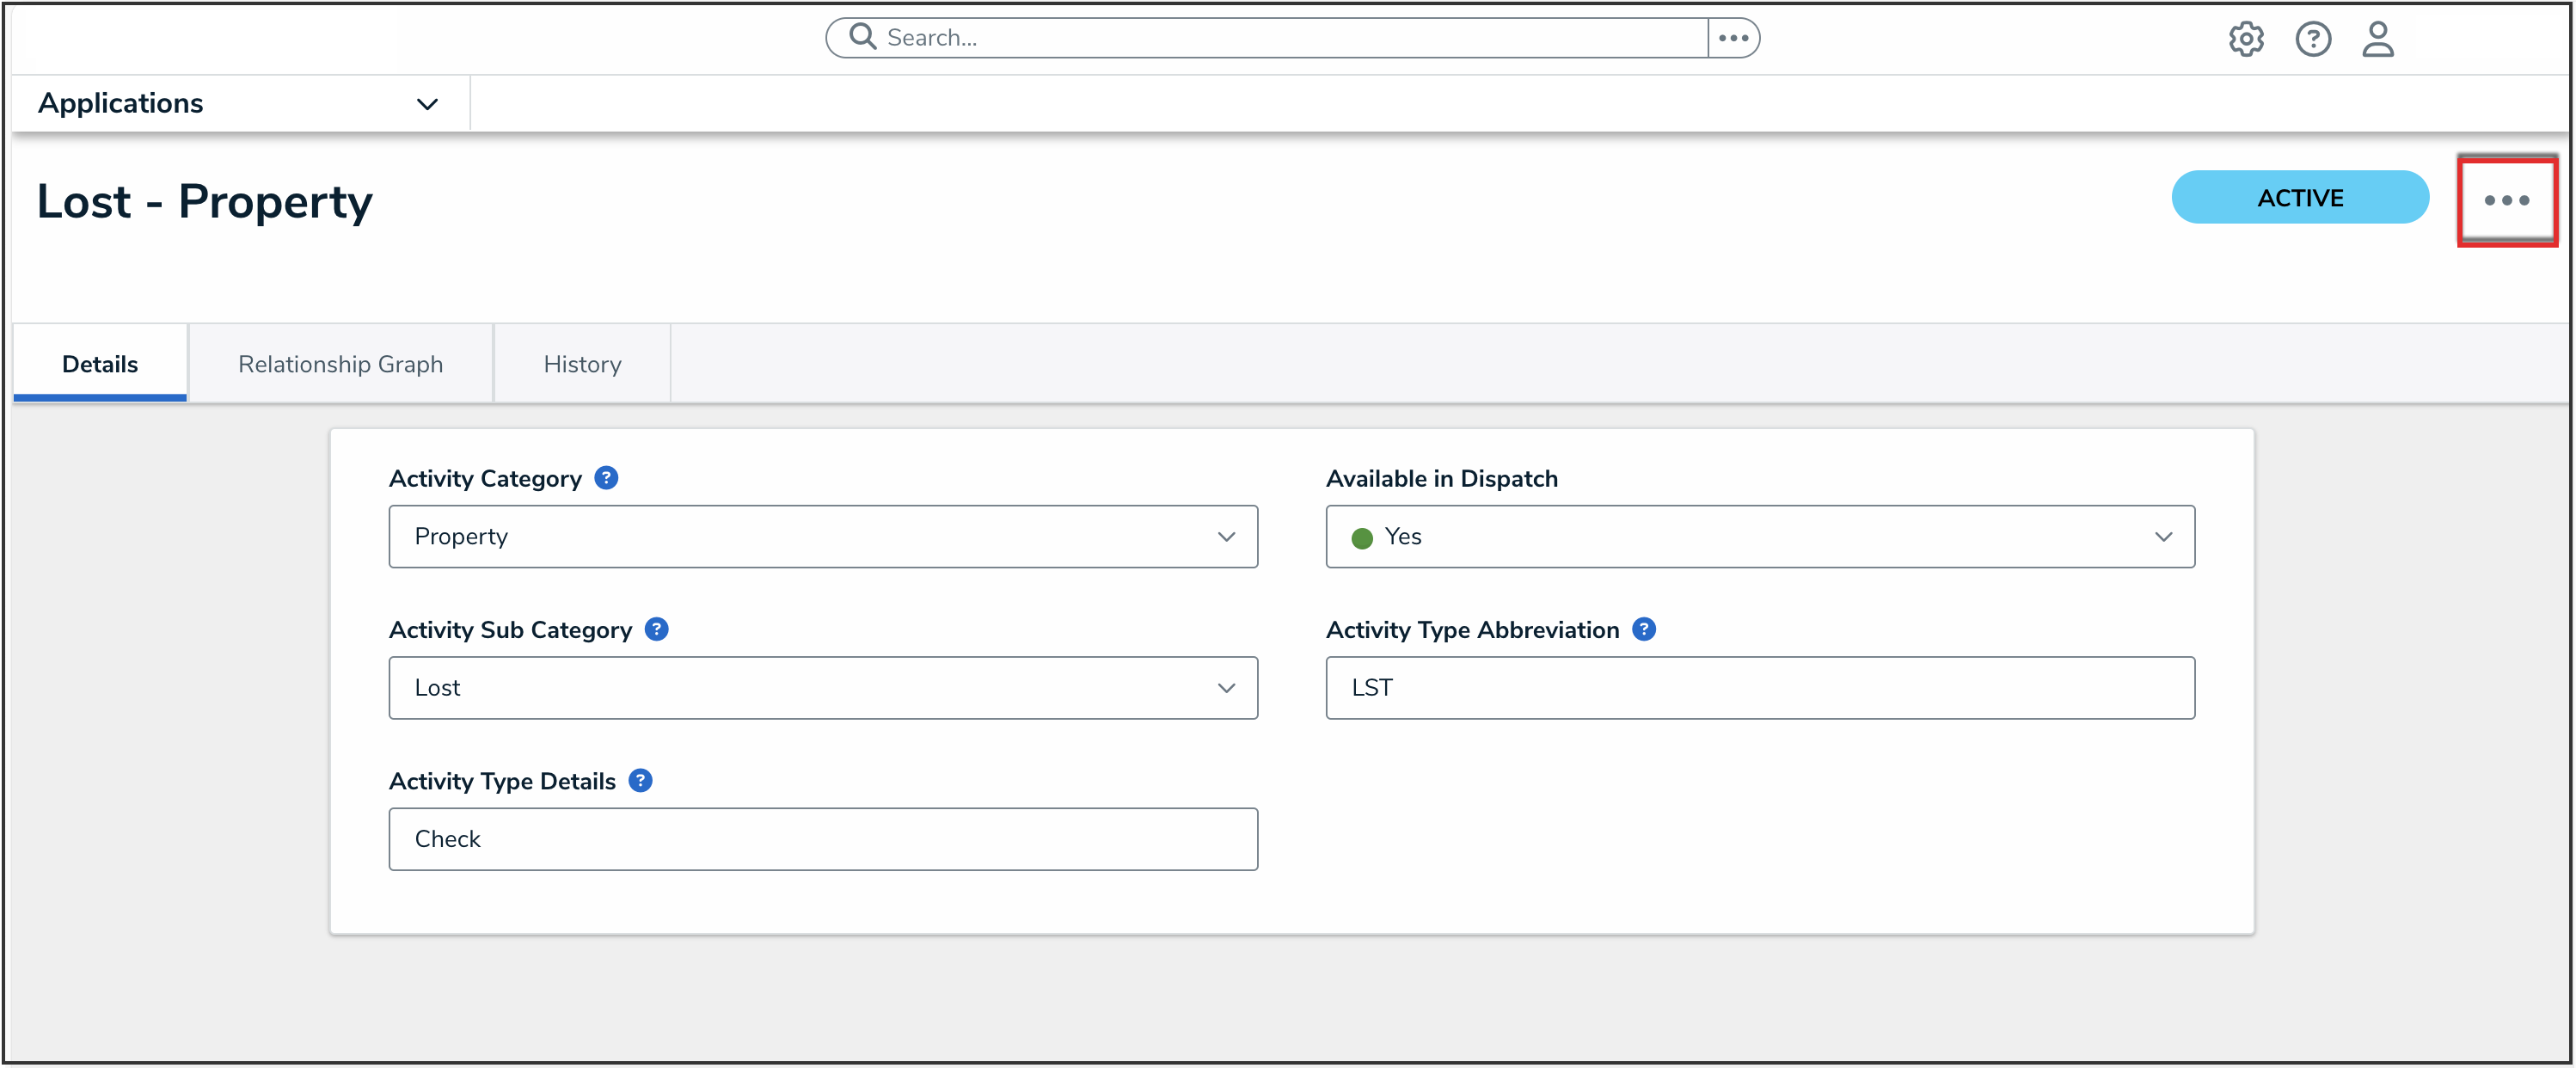
More Actions Icon
- Click Delete.
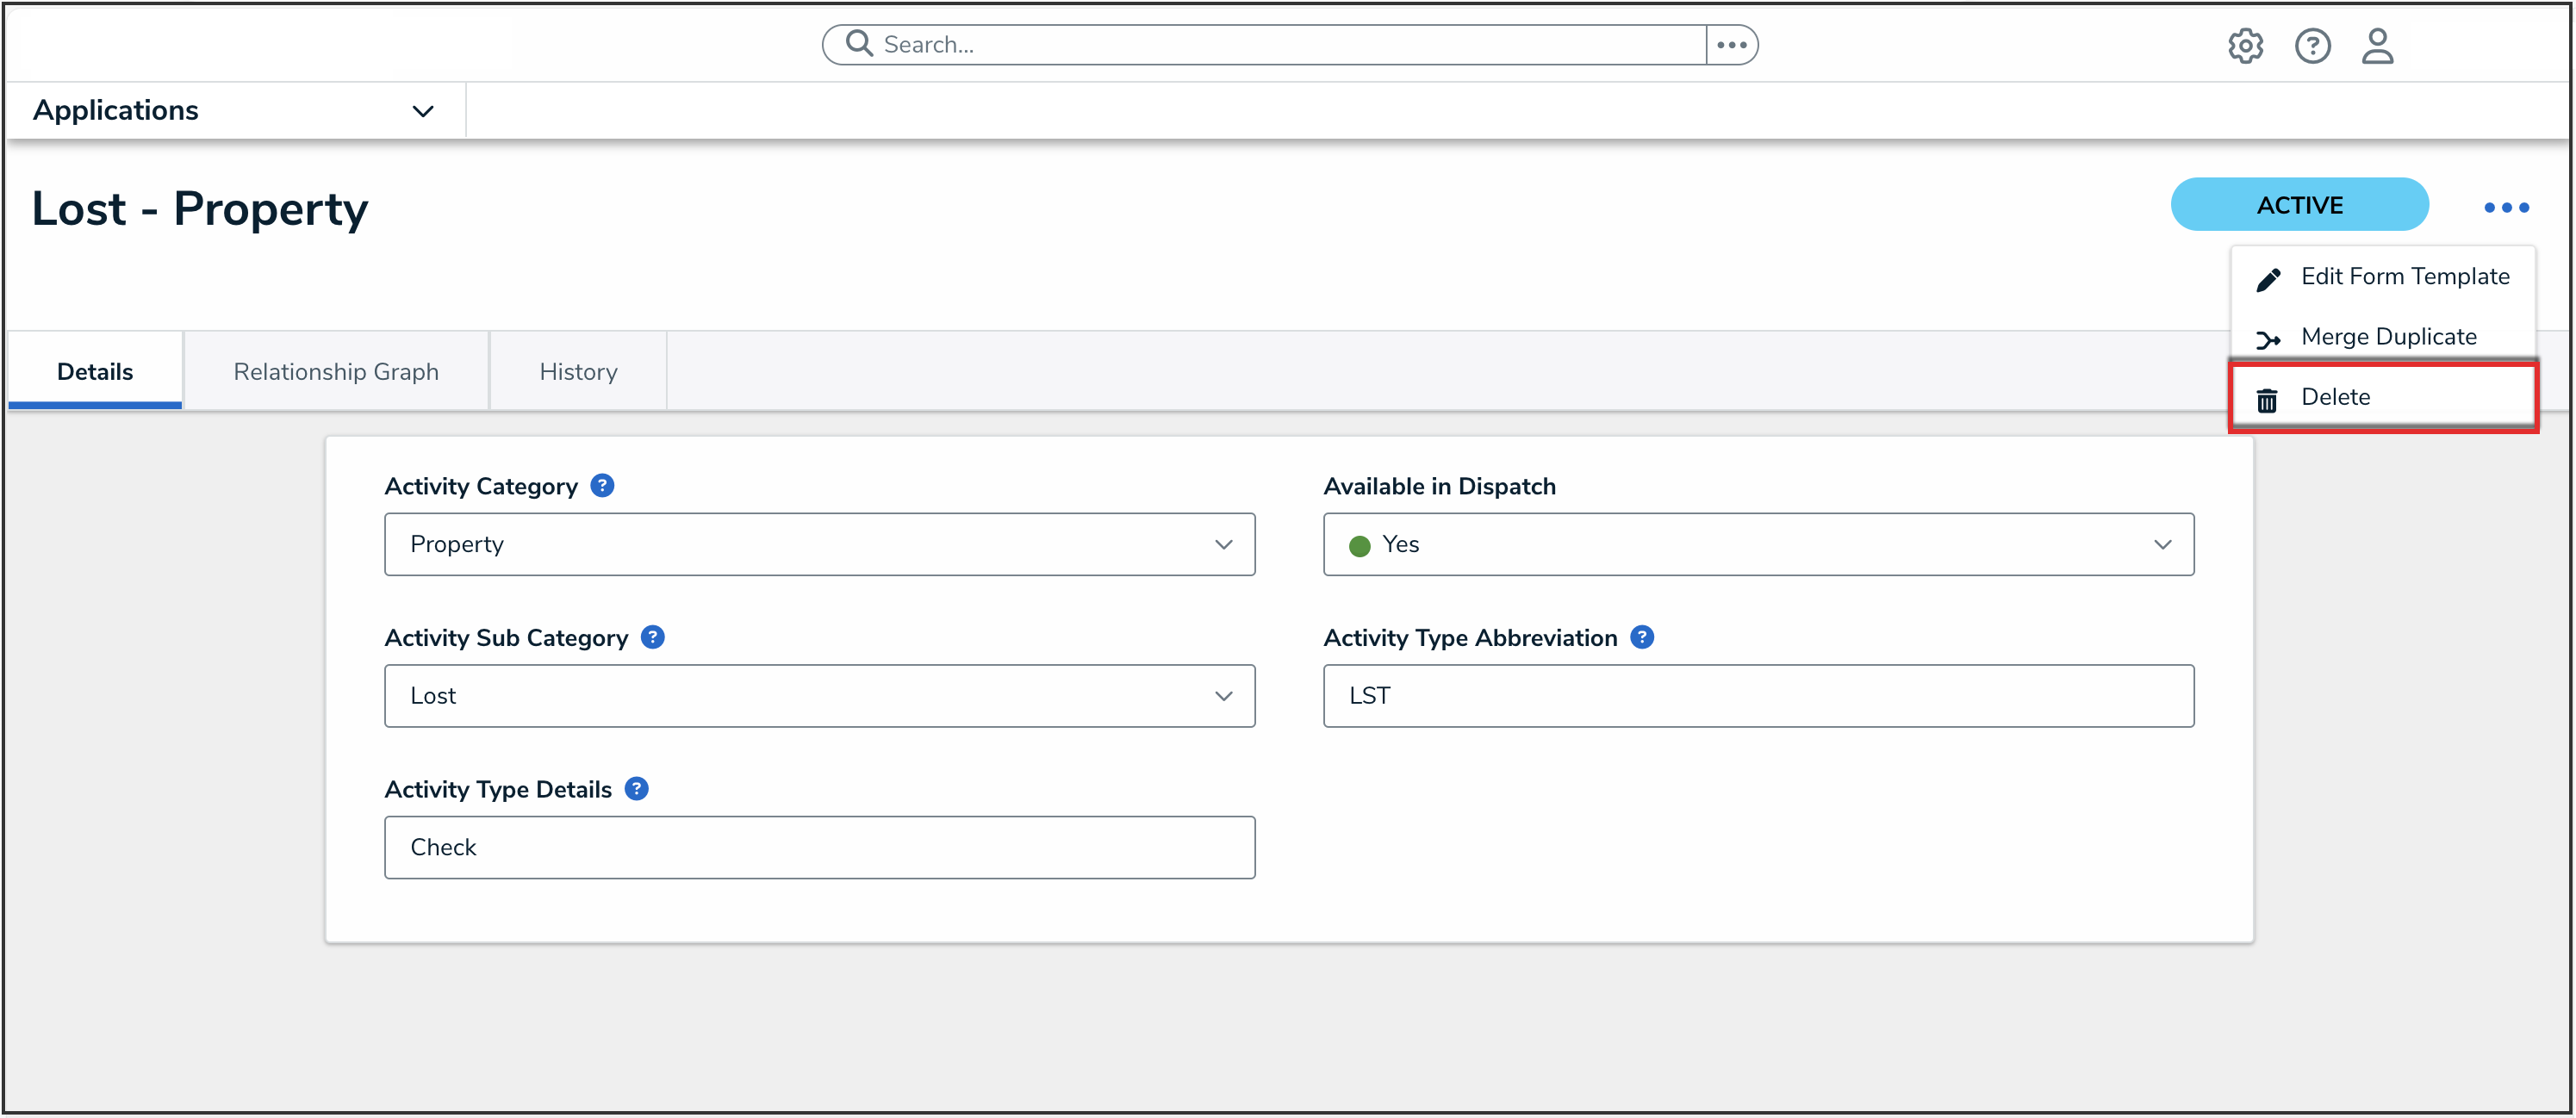
Delete
- If the Retain Data for Analytics toggle switch on the Data Retention tab is enabled for the object type, the following Deletion Request pop-up will appear when deleting an object. For more information, please refer to the Data Retention section.

Deletion Request Pop-up
- Read the warning as it will outline the number of relationships and references that will be impacted if the object is deleted from the system.
- (Optional): Select the Retain Data for Analytics toggle switch to turn it on to retain the information selected on the Data Retention tab for the object type and delete all other related data.
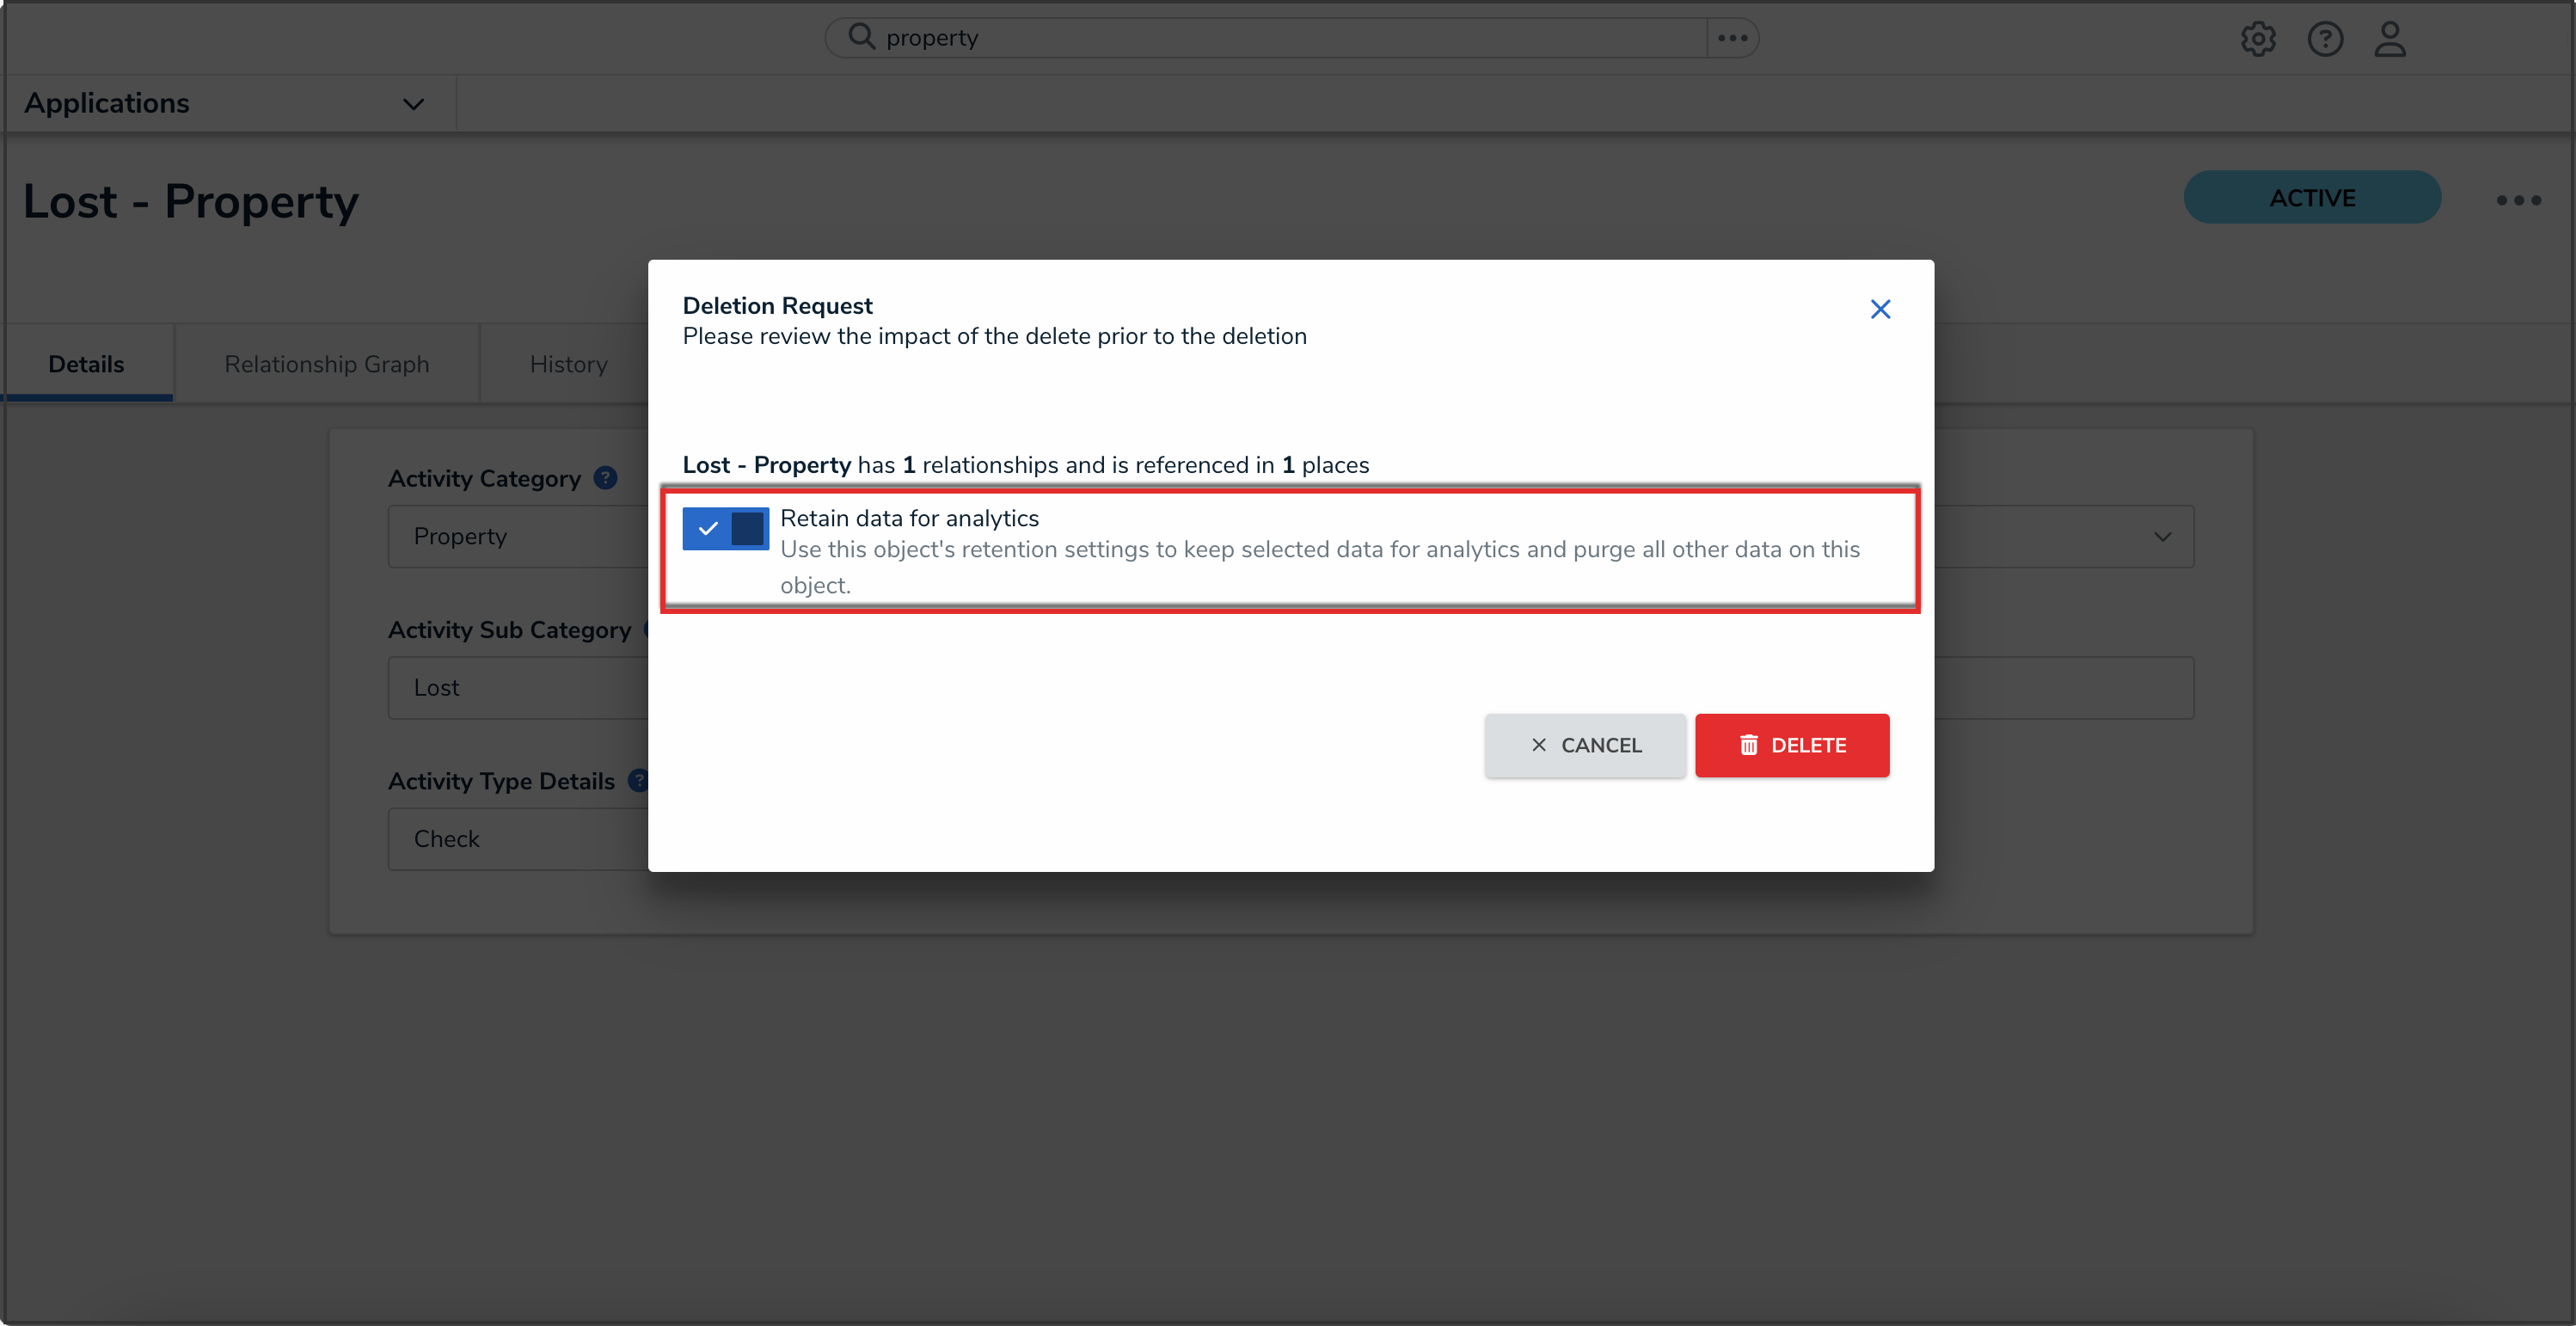
Enabled Retain Data for Analytics Toggle Switch
- (Optional): Leave the Retain Data for Analytics toggle switch disabled to delete the object and all related data from the system.
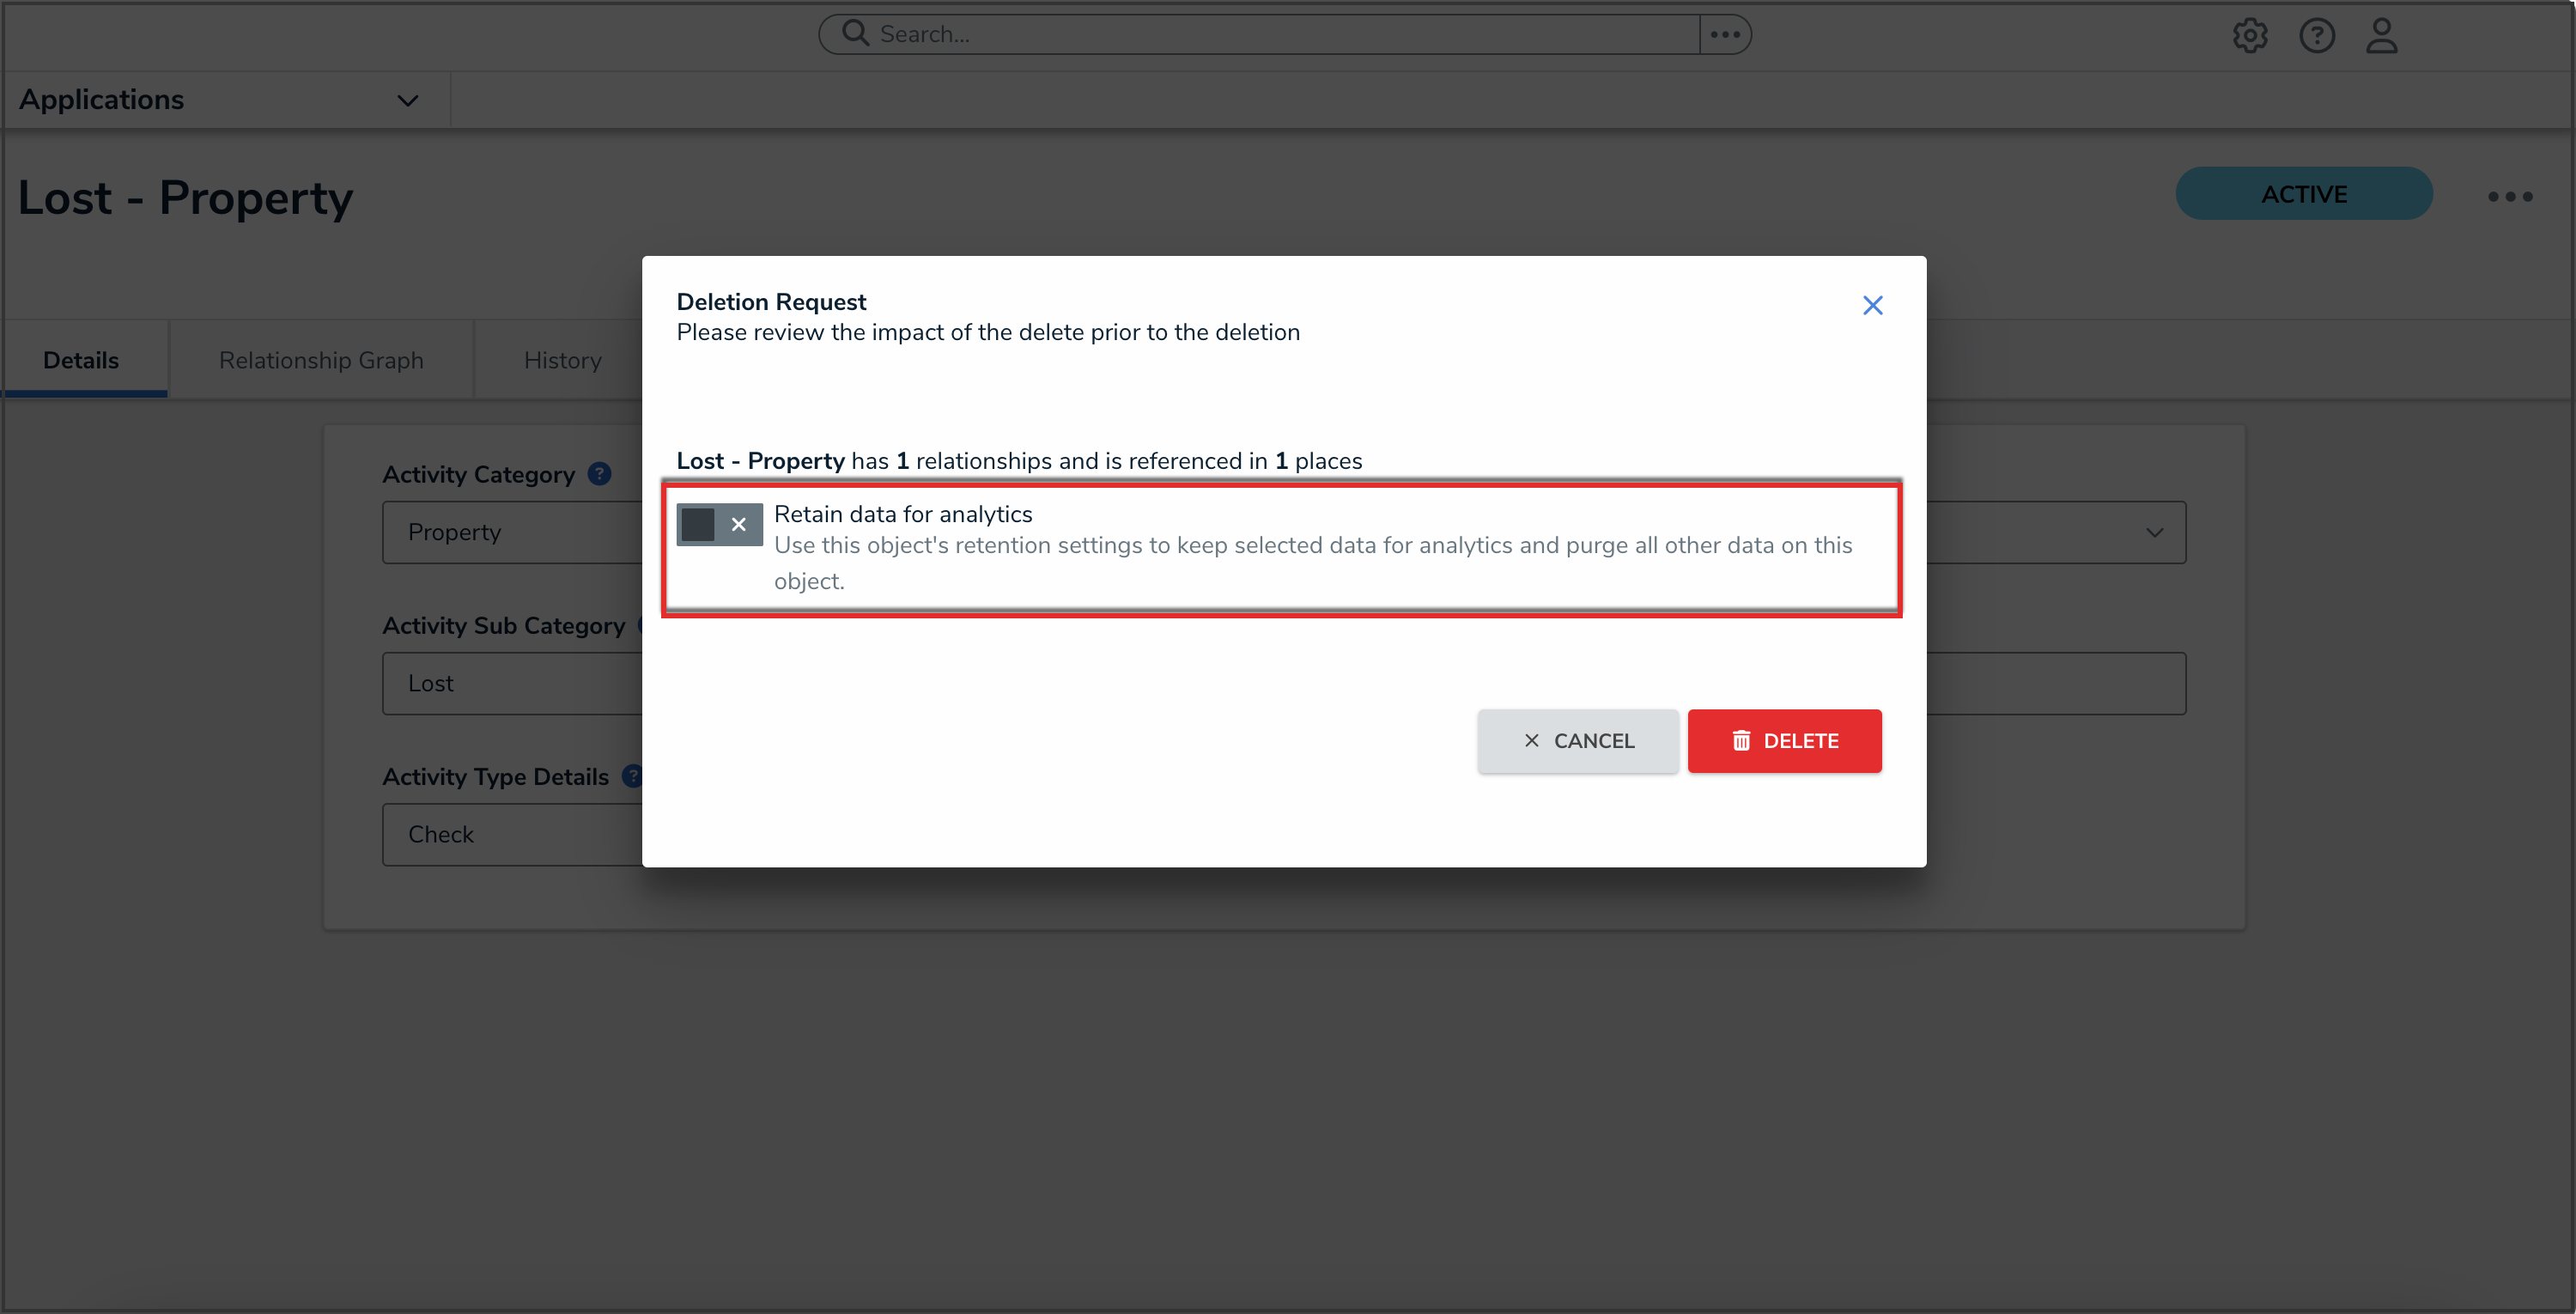
Disabled Retain Data for Analytics Toggle Switch
- Click the Delete button. The object will go into a purge queue and cannot be reverted. It can take up to one week to fully remove the object, and related information from the system.
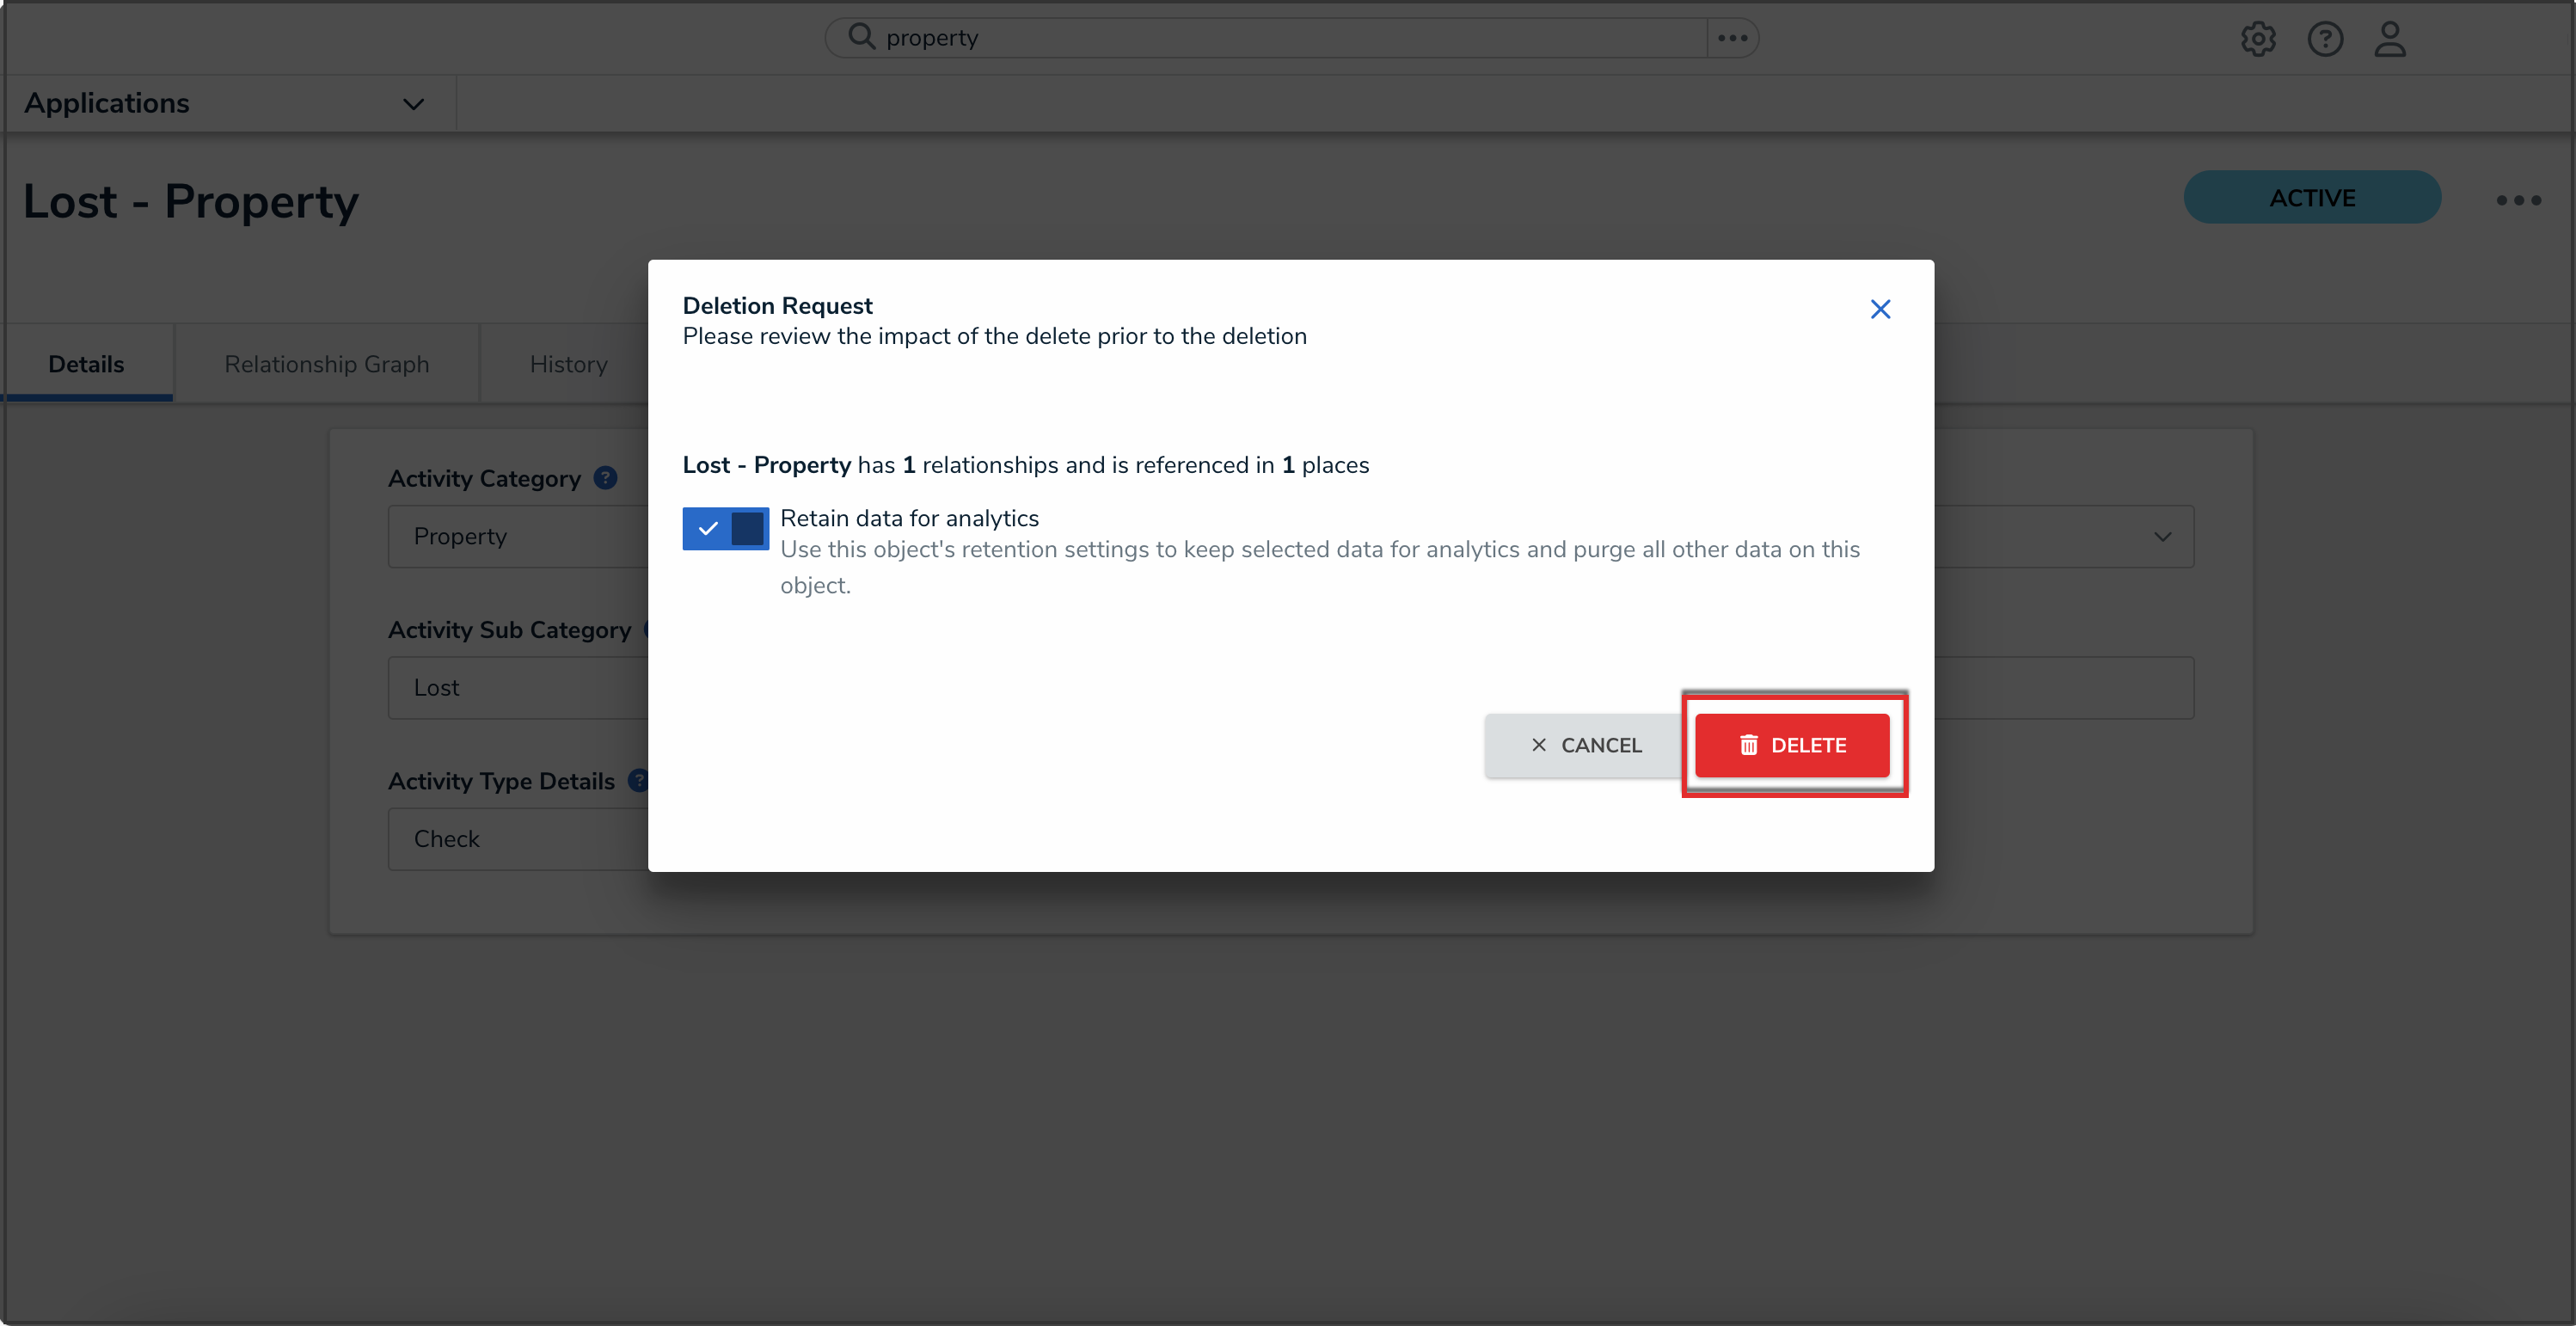
Delete Button
- If the Retain Data for Analytics toggle switch on the Data Retention tab is disabled for the object type, the following Deletion Request pop-up will appear when deleting an object.

Deletion Request Pop-up
- Read the warning as it will outline the number of relationships and references that will be impacted if the object is deleted from the system.
- Click the Delete button. The object will go into a purge queue and cannot be reverted. It can take up to one week to fully remove the object, and related information from the system.
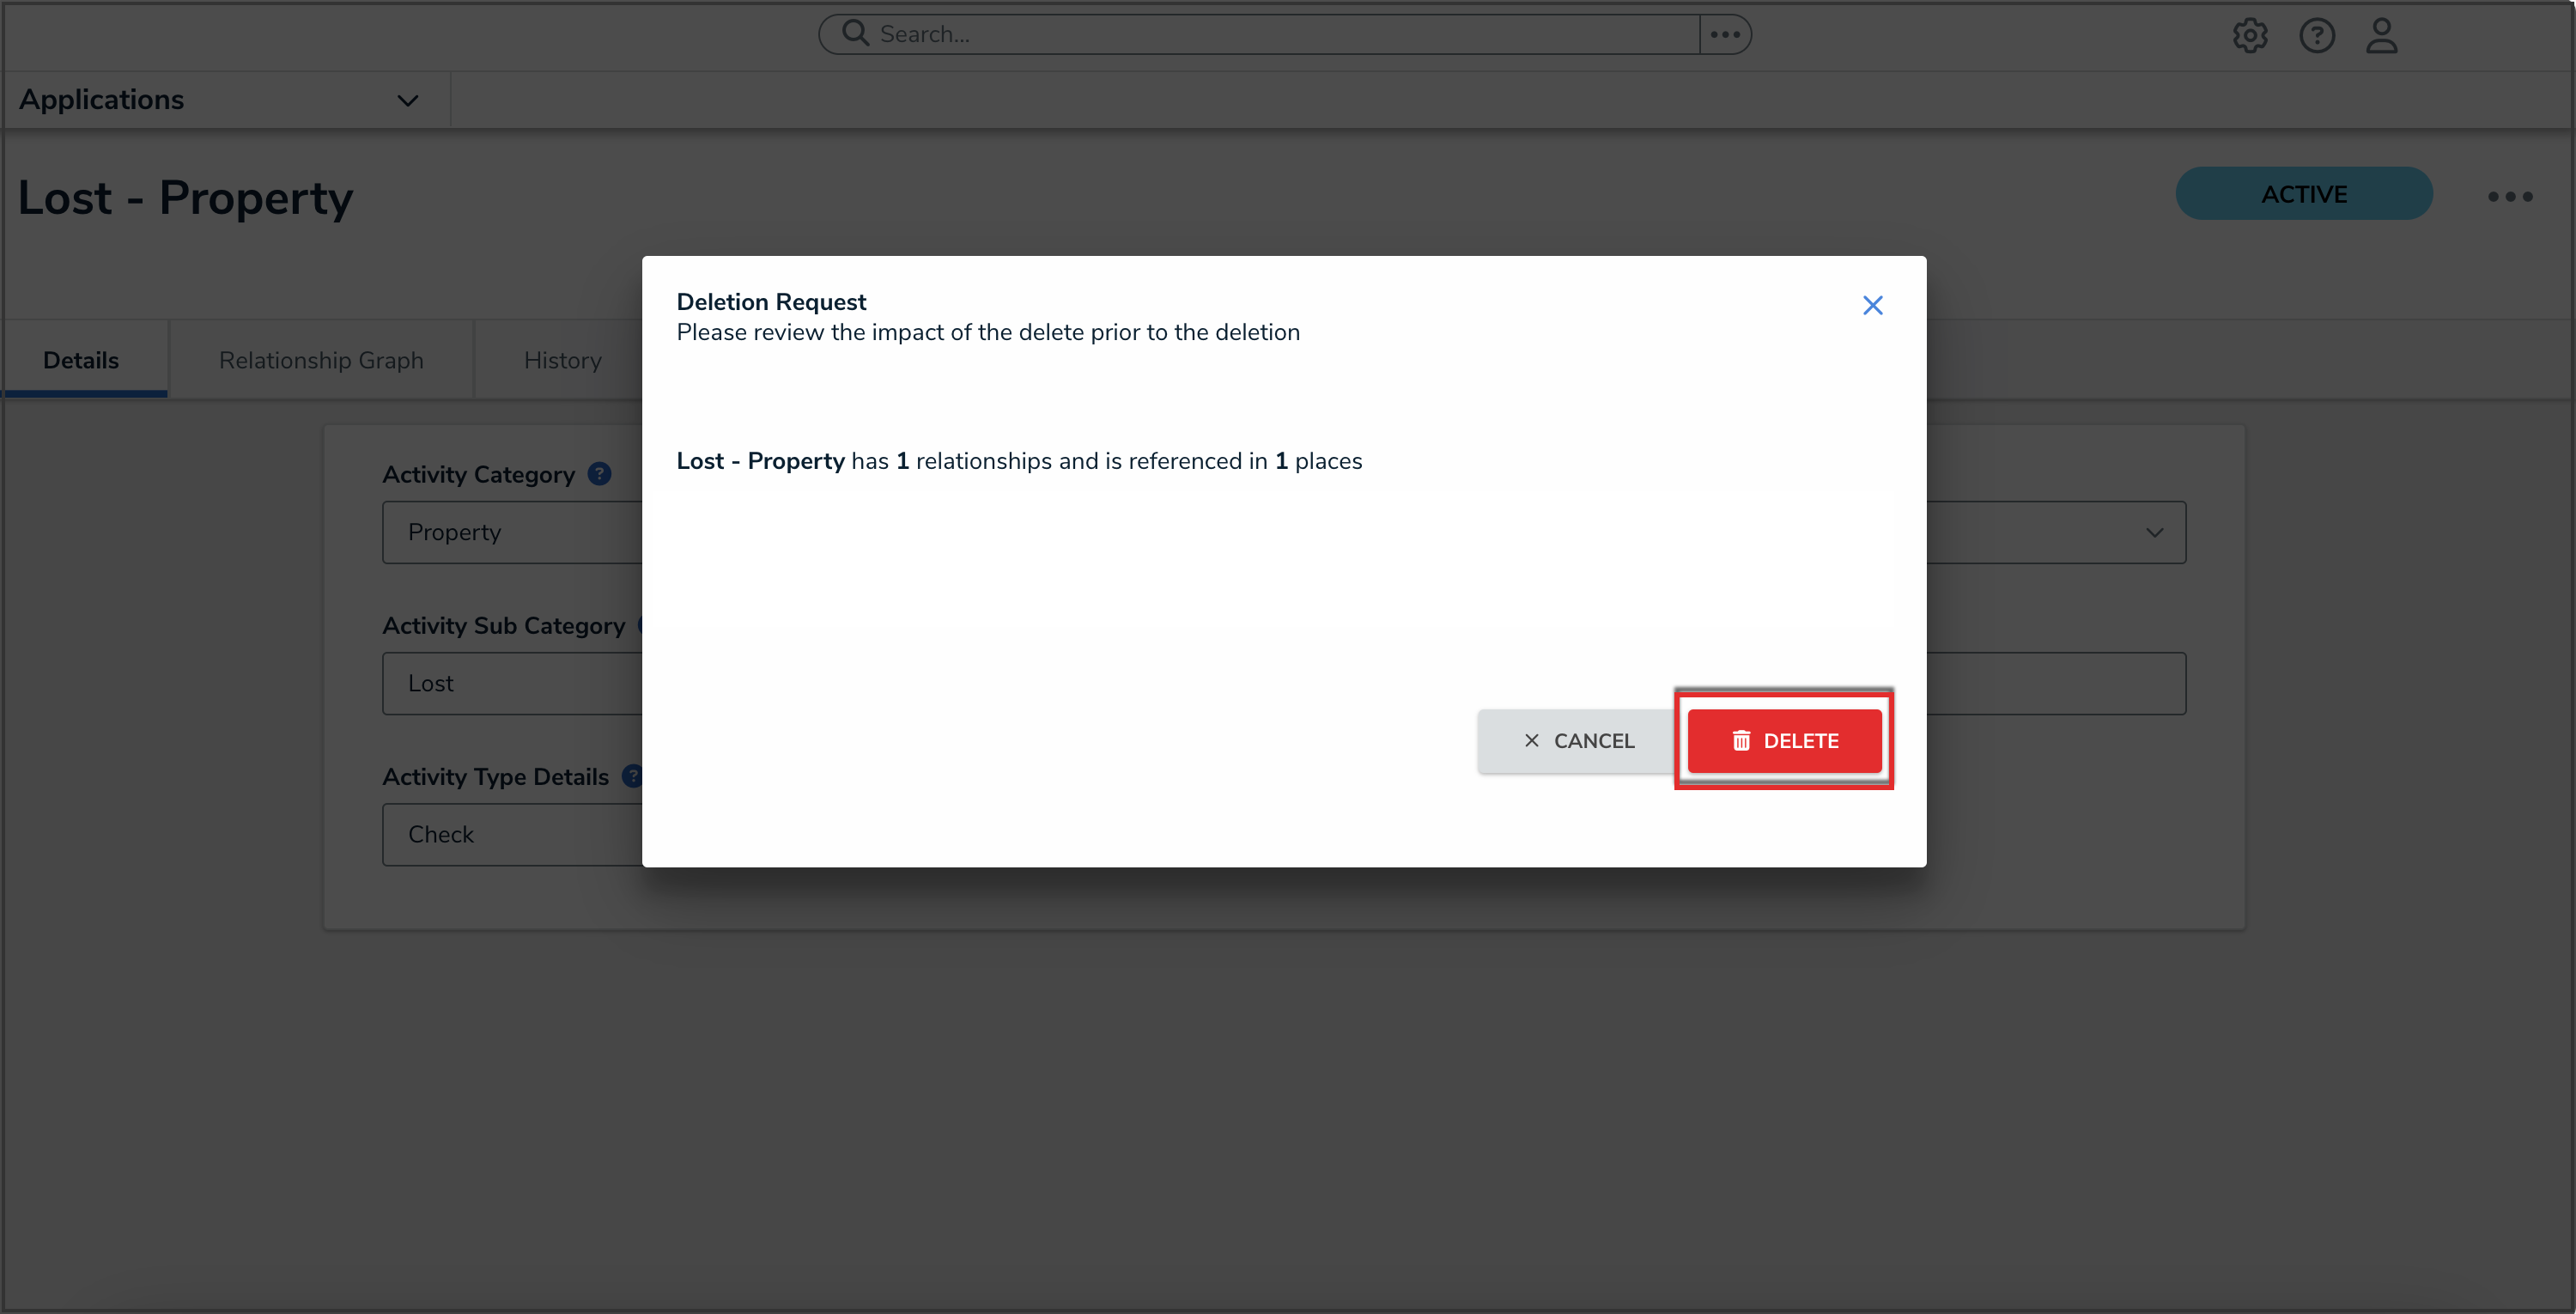
Delete Button
 Note:
Note:


