An object type’s fields are where users will input data. Fields are available in the following formats:
- Text: A text field that allows for a single line or multiple lines of text, concatenations, rich text formatting, and translations.
- Numeric: A field that allows for numbers.
- Date & Time: A picker that allows you to select the date and time. All dates and times are saved and displayed in UTC format.
- Select List: A dropdown menu with multiple options to choose from.
- Attachments: An area on the form that allows users to upload files, insert links to websites, or both. Supported document files are searchable by keywords or upload dates.
- Image Attachment: A field through which images can be uploaded and embedded onto a form.
All fields saved to an object type will appear on the object type’s default form, but you can select which fields will appear on configurable forms associated with the object type.
 | This section explains how to create and add fields to an object type, but you can create, edit, and delete fields from the Fields settings. See the Fields section for more detailed information and instructions on each field type. |
To add fields to an object type:
- Click the
 icon in the top bar > Object Types in the Data Model section.
 - Click to select the object type with to configure.
- Click the Fields tab.

The Fields tab with no previously added fields on the object type. - To create a new field to add to the object type:
- Click Add Field(s) > Add a New Field.
- Select a field type from the Field Type dropdown menu.
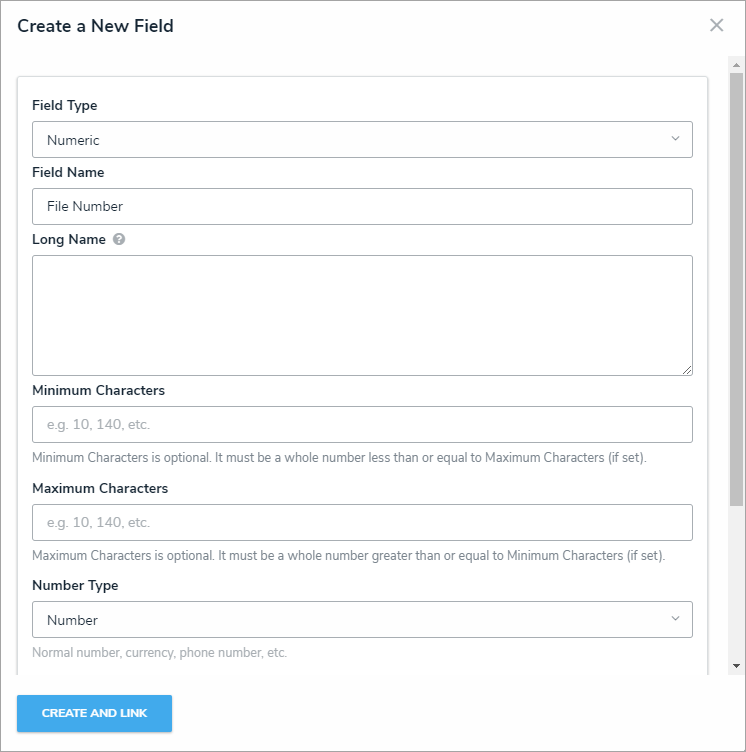
- Enter the field’s details, including name, minimum and maximum number of characters, and any other settings as needed. If needed, provide additional information or instructions on completing the field in the Long Name section, which can be styled using Markdown.
 The Create a New Field screen, accessed from the Edit Object Type page.
- Click Create and Link to add the field to the object type.

See the Fields section for more detailed information about each field type.
- To add an existing field to the object type:
- Click Add Field(s).
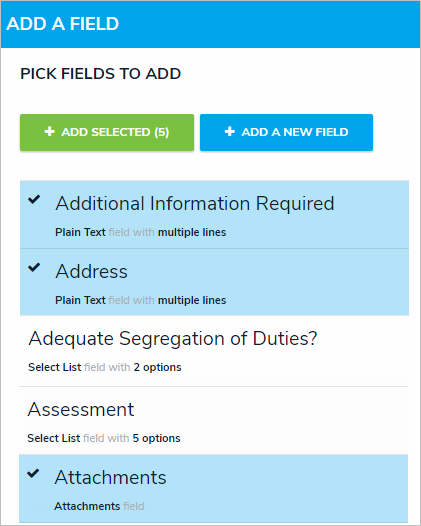
- Click one or more fields in the Pick Fields to Add section.
Selecting existing fields to add to the object type. Existing fields can be added to multiple object types; however, note that deleting the field or modifying the field's settings will affect all related object types. - Click Add Selected.
- To edit a field, click it in the tab to open the Editing Field page.
- To delete a field from the object type only, click the
icon.
- Click Done when finished.
Important Notes
- If needed, you can change the field’s unique name by clicking the
icon next to the Unique Name field to unlock and edit it; however, it’s strongly recommended that you do not change the unique name as its default value is used throughout the Core system and altering it may interfere with existing data.
- Any changes to the field's settings are applied to all related object types.
- Deleting a field will remove it from all related object types.
To edit or delete a field:
- Click the
 icon in the top bar > Fields in the Data Model section.
 - Enter the name of the field in the Search field or click on a field in the list.
- Make changes to the field’s name as needed, including the Field Name and Long Name.
- Make any other changes to the field as needed.
- To delete the field, click the
icon, then click Yes to confirm.
- Click Done when finished.
 | If the field has been added to one or more object types, those object types will appear in the Related Object Types section at the bottom of the Editing Field page. Click the object type to view its Edit Object Type page. |
 icon in the top bar > Object Types in the Data Model section.


 icon.
icon. icon next to the Unique Name field to unlock and edit it; however, it’s strongly recommended that you do not change the unique name as its default value is used throughout the Core system and altering it may interfere with existing data.
 icon, then click Yes to confirm.